

Returning a result from an Android Activity
The Android platform prescribes a number of patterns for putting together an application that plays well with the platform and feels familiar to users.
One of those patterns is the hierarchical use of Activities to segregate the application, and to provide re-usable chunks of application that can service certain requirements.
The higher design goal is to create an eco-system of separable Activities that fulfil Intents that can be re-used by other applications - for example: if my application needs an image, it can request one by invoking an Intent to use an image, and all Activities that can fulfil that Intent will be offered as a choice to the user.
Lets see what that looks like with a code example.
Invoking an Activity with an Intent
First of all, lets look at how to invoke an activity with an Intent. Lets say we want to explicitly open the Gallery app to select an image to use in our application. Its very simple:
private static final int PICK_IMAGE_REQUEST = 1;

public void selectImageFromGallery() {
    Intent _intent = new Intent();
    _intent.setType("image/*");
    _intent.setAction(Intent.ACTION_GET_CONTENT);
    startActivityForResult(
        Intent.createChooser(_intent, "Select Picture"),
        PICK_IMAGE_REQUEST
    );
}
This will open the gallery app and allow the user to select an image. Notice that in the call to startActivityForResult we provided an int value in the form of PICK_IMAGE_REQUEST - this tells the system what return-code to use when the invoked Activity completes, so that we can respond correctly.
Lets see how we do that ..
@Override
protected void onActivityResult(
    int aRequestCode, int aResultCode, Intent aData
) {
    switch (aRequestCode) {
        case PICK_IMAGE_REQUEST:
            handleUserPickedImage(aData);
            break;
        case SOME_OTHER_REQUEST:
            handleSomethingElse(aData);
            break;
    }
    super.onActivityResult(aRequestCode, aResultCode, aData);
}
Here we're overriding a method of Activity to handle results being passed back from invoked activities.
The value of aRequestCode is the value passed to the startActivityForResult method (so for us its PICK_IMAGE_REQUEST), and is how we distinguish which activity is returning a result.
aResultCode will contain the value set by the invoked Activity's setResult(int), while aData Intent contains any data returned by the Activity. In our example the Intent contains the Uri of the selected image, which we can access like this:
private void handleUserPickedImage(Intent aData) {
    if ((aData != null) && (aData.getData() != null)) {
        Uri _imageUri = aData.getData();
        // Do something neat with the image...
    } else {
        // We didn't receive an image...
    }
}
Returning values from an Activity
Great, we can invoke existing Activity's and collect results. What does it look like from the other side? - How does the Activity return its results to us?
Uri _resultUri = .. // Some uri we want to return
Intent _result = new Intent();
_result.setData(_resultUri);
setResult(Activity.RESULT_OK, _result);
finish();
Its a simple as that:
- Create an Intent (the result object)
- Set the result data (you don't have to return a Uri - you can use the putExtra methods to set any values you want)
- Call
setResulton your Activity, giving it the result Intent - Call
finishon your Activity
Custom fonts in Android
I've been playing with Android since late December (2011). Its been fun. I've been meaning to document some things I've picked up, but I've been pretty busy hacking away. Time to write a few things down before I forget!
In my - admittedly limited - experience, Android devices typically come pre-installed with just the one font family. Before Ice-Cream Sandwich that font was Droid. In Ice-Cream Sandwich its Roboto.
If you want to use other fonts in your app, you must package them as assets. I believe Android has supported true-type fonts since the beginning, but now also supports open-type fonts (since 1.6). I always use true-type fonts anyway.
To bundle the font, simply place the .tff file in your project's assets directory. Here's how you load the font in your Activity code:
Typeface t = Typeface.createFromAsset(getAssets(), "my-font.ttf");
If you want to reference the font from xml markup you're in for a frustrating time. If you do want to take that path, check out this handy StackOverflow post.
If, like me, you prefer to set the font programmatically to the necessary views, you can call setTypeface(Typeface) on TextView's and EditText's.
In some of my layouts (for example "help" screens) I have many TextView's interspersed with ImageView's. To make life a bit easier I use the following utility method to set the font on all TextView's in the view hierarchy:
public static void setFontForAllTextViewsInHierarchy(
    ViewGroup aViewGroup, Typeface aFont) {
    for (int i=0; i<aViewGroup.getChildCount(); i++) {
        View _v = aViewGroup.getChildAt(i);
        if (_v instanceof TextView) {
            ((TextView) _v).setTypeface(aFont);
        } else if (_v instanceof ViewGroup) {
            setFontForAllTextViewsInHierarchy((ViewGroup) _v, aFont);
        }
    }
}
Using this utility method is as simple as finding ViewGroup whose descendants need a font change, then invoking the method with that ViewGroup:
// somewhere in an Activity..
Typeface font = Typeface.createFromAsset(getAssets(), "my-font.ttf");
ViewGroup vg = (ViewGroup) findViewById(R.id.myViewGroup);
Utils.setFontForAllTextViewsInHierarchy(vg, font);
I worried at first that this would cause a noticeable re-draw where you first see the system font, then it flashes over to the custom font. Since I tend to set my fonts in my Activity's onCreate method immediately following the call to setContentView, my custom font is already specified before the first onDraw invocation hits any of my View's.
Android 2.1 - trouble with bitmaps
I got the following mail from a user of my app:
Hi,
Comic strip is a great app and i love it very much. But there are couple of problem
- It force close when i apply FX
- When i preview the strip, the pictures turn out black
Please fix it My handphone is samsung galaxy beam andriod 2.1
This user has paid for the "pro" version. He also added the following comment in the market:
(2 stars) on February 18, 2012 (Samsung Galaxy Beam with version 1.5.0) It force close when i fx the pics and the pics turn out blank in the preview page.. Will upgrade to 5 stars when fixed
Interesting use of both carrot ("will upgrade to 5 stars"") and stick (current rating: 2 stars). I think the rating mechanism is pretty harsh on developers, but that's a topic for another post :)
Black images in preview
I started by looking into problem (2) - the black images in preview. This one sounded unusual - I've had no other reports of this problem at all.
I set up an Android 2.1 device in my emulator and set about trying to replicate the issue. I allowed it a 24Mb heap per app, and started to look into the black images in preview.

I was pretty surprised to see that there was indeed a problem. In all my testing using other Android API levels I hadn't encountered any such issue. Every time I tried to re-load one of the images for preview I saw the following error in log-cat:
Resolve uri failed on bad Bitmap uri: ...
The strange thing, of course, is that the uri was perfectly fine, works great in all API levels greater than 7, was created by the system using Uri.fromFile(file), and is working fine even in API level 7 when I reload the image in the scene editor activity!
Fix for "resolve uri failed on bad bitmap uri"
Given that the scene-editor was able to load the image just fine, I compared the code I was using to load images in the scene-editor with the code in the preview-activity. I had the following:
// scene-editor-activity snippet - works fine!
Bitmap _b = BitmapFactory.decodeStream(
    rslv.openInputStream(aScene.getBackgroundUri()), null, _opts
);
_img.setImageBitmap(_b);

// preview-activity snippet - fails with 'bad bitmap uri'
ImageView _image = new ImageView(ctx);
_image.setImageURI(aScene.getBackgroundUri());
It seems that ImageView in Android versions less than 2.2 (API level 8) has a problem with directly resolving perfectly valid Bitmap uri's.
In the scene-editor I was always resolving the Uri to an InputStream using ContentResolver (which you can obtain from the Activity with getContentResolver()), whilst in my preview activity I was simply expecting ImageView to resolve the uri.
The fix for all Android versions was to use the slightly more laborious method of loading the Bitmap via ContentResolver and setting the Bitmap to the ImageView, like this:
// Resolve a uri to a Bitmap
private Bitmap getImageBitmap(Uri aUri) {
    try {
        BitmapFactory.Options _opts = new BitmapFactory.Options();
        _opts.inScaled = false;
        _opts.inSampleSize = 1;
        _opts.inPreferredConfig = config;

        return BitmapFactory.decodeStream(
            rslv.openInputStream(aUri), null, _opts
        );
    } catch (Exception anExc) {
        L.e("loading bitmap", anExc);
        return null;
    }
}

// set a bitmap instead of a uri...
_image.setImageBitmap(getImageBitmap(aScene));
If the Uri really resolves to a missing file then I'll still get black images, but this is only likely in fairly extreme circumstances, and at least the app doesn't crash :). I suppose a better solution would be to return the app icon in such cases.
So to the next problem...
Force-Close while applying FX
My first guess was that this was going to be a VM budget issue. I've had them before, but with the v1.5.0 release I seemed to have largely solved them (no crash reports at all since). Here are some of the issues:
- Older Android devices only allow 16Mb to each running app. The generation of devices from about 2 years ago (e.g. original Motorola Droid) often allow 24Mb per app, which is still pretty small for dealing with large images. Current generation (e.g. Samsung Galaxy Mini and S2) allow 64Mb (yay!).
- One of the nice things about Android devices is the way in which they integrate with Google's eco-system. For example, the "Gallery" app on most devices shows images from your Picasa Web Albums, as well as photos taken directly on the device. Of course, this means that the phone has access to potentially very large images taken with a "real" camera.
- Many mobiles these days have 8MP camera's built in, therefore a single photo can be very large!
- The nature of my app (making comic strips from your own images) means that I am dealing with potentially many images at any given time. Applying FX requires at least two such images concurrently in-memory (the source, and the target). The finished strips are rendered as rows of 350x350 images, so the size of that final bitmap depends on how many frames you add to your strip.
A quick investigation revealed that I wasn't exceeding the VM budget - nowhere near in fact: the app crashed frequently with the VM size still less than 7Mb. Switching back and forth between API levels 7 and 8 showed that this was definitely only a problem at API level 7 (Android 2.1).
In 2.2 and above I can go through all of the FX several times over with no problems. In 2.1 the app usually crashes at the application of the second effect, but sometimes goes at the first or third attempt.
SIGSEGV while recycling Bitmap's
My app allows you to apply some image effects to the photos you select for each frame, to give a more comic-book feel. For example, you can apply a half-tone print effect, or a quantised and outlined "cartoon" effect.
To process these effects I have to juggle multiple Bitmap's and Canvas's, and - because of the resource-constrained environment of a mobile device - clean up the memory that these objects were using as soon as they are no longer needed.
To make the user-experience more friendly the FX are processed in a background thread. On the UI thread I show a dialog with a spinner to let the user know something is happening. This is nothing special - I'm using the AsyncTask class provided by the Android framework for exactly this purpose.
In Android - pre Honeycomb - Bitmap memory is allocated off-heap by JNI calls in the Bitmap class. It doesn't gain you extra memory to play with in your VM - the bitmap pixel data is still counted within the total memory used by your app (witness the number of StackOverflow questions pertaining to Bitmap's and VM budget!). In Honeycomb the bitmap pixel data has moved into the VM
As soon as you're done with a Bitmap, you are supposed to let the Runtime know, by invoking Bitmap.recycle(), then null'ing the reference to the Bitmap. Fine, my app works great on API levels above 7 - no crashes, no warnings, no memory leaks.
At API level 7 (Android 2.1) however, this is what happens:
02-19 09:41:19.710: I/DEBUG(28): *** *** *** *** *** *** *** *** ***
    *** *** *** *** *** *** ***
02-19 09:41:19.710: I/DEBUG(28): Build fingerprint:
    'generic/sdk/generic/:2.1-update1/ECLAIR/35983:eng/test-keys'
02-19 09:41:19.710: I/DEBUG(28): pid: 224, tid: 234
    >>> com.roundwoodstudios.comicstripitpro <<<
02-19 09:41:19.710: I/DEBUG(28): signal 11 (SIGSEGV), fault addr 00000028
02-19 09:41:19.720: I/DEBUG(28):
    r0 00000000  r1 0012715c  r2 00000000  r3 0012715c
02-19 09:41:19.720: I/DEBUG(28):
    r4 00137e18  r5 0012719c  r6 00000000  r7 00000000
02-19 09:41:19.720: I/DEBUG(28):
    r8 00000001  r9 00000000  10 00000000  fp 00000000
02-19 09:41:19.720: I/DEBUG(28):
    ip ff000000  sp 47285c58  lr 00000000  pc ac065288
    cpsr 60000010
02-19 09:41:19.840: I/DEBUG(28):  #00  pc 00065288  /system/lib/libskia.so
02-19 09:41:19.840: I/DEBUG(28):  #01  pc 00065dcc  /system/lib/libskia.so
02-19 09:41:19.840: I/DEBUG(28):  #02  pc 00064148  /system/lib/libskia.so
02-19 09:41:19.840: I/DEBUG(28):  #03  pc 00041986
    /system/lib/libandroid_runtime.so
02-19 09:41:19.850: I/DEBUG(28):  #04  pc 0000f1f4  /system/lib/libdvm.so
02-19 09:41:19.850: I/DEBUG(28):  #05  pc 00037f90  /system/lib/libdvm.so
02-19 09:41:19.850: I/DEBUG(28):  #06  pc 00031612  /system/lib/libdvm.so
02-19 09:41:19.860: I/DEBUG(28):  #07  pc 00013f58  /system/lib/libdvm.so
02-19 09:41:19.860: I/DEBUG(28):  #08  pc 00019888  /system/lib/libdvm.so
02-19 09:41:19.860: I/DEBUG(28):  #09  pc 00018d5c  /system/lib/libdvm.so
02-19 09:41:19.880: I/DEBUG(28):  #10  pc 0004d6d0  /system/lib/libdvm.so
02-19 09:41:19.880: I/DEBUG(28):  #11  pc 0004d702  /system/lib/libdvm.so
02-19 09:41:19.880: I/DEBUG(28):  #12  pc 00041c78  /system/lib/libdvm.so
02-19 09:41:19.890: I/DEBUG(28):  #13  pc 00010000  /system/lib/libc.so
02-19 09:41:19.890: I/DEBUG(28):  #14  pc 0000fad4  /system/lib/libc.so
02-19 09:41:19.890: I/DEBUG(28): code around pc:
02-19 09:41:19.890: I/DEBUG(28): ac065278 e1d4e2f4 e1d472f6 e5946004 e197200e
02-19 09:41:19.890: I/DEBUG(28): ac065288 e5969028 e596a024 0a00002e e59db00c
02-19 09:41:19.900: I/DEBUG(28): ac065298 e2848028 e1a0c008 e8bb000f e8ac000f
02-19 09:41:19.900: I/DEBUG(28): code around lr:
02-19 09:41:19.900: I/DEBUG(28): stack:
02-19 09:41:19.900: I/DEBUG(28):     47285c18  4001d001
    /dev/ashmem/mspace/dalvik-heap/zygote/0 (deleted)
02-19 09:41:19.900: I/DEBUG(28):     47285c1c  ad04d21d  /system/lib/libdvm.so
02-19 09:41:19.900: I/DEBUG(28):     47285c20  00000000
02-19 09:41:19.910: I/DEBUG(28):     47285c24  00010002  [heap]
02-19 09:41:19.910: I/DEBUG(28):     47285c28  00010002  [heap]
02-19 09:41:19.910: I/DEBUG(28):     47285c2c  418ab254
    /dev/ashmem/dalvik-LinearAlloc (deleted)
02-19 09:41:19.910: I/DEBUG(28):     47285c30  0012a0f8  [heap]
02-19 09:41:19.910: I/DEBUG(28):     47285c34  ad04d6d9  /system/lib/libdvm.so
02-19 09:41:19.910: I/DEBUG(28):     47285c38  ad07ff50  /system/lib/libdvm.so
02-19 09:41:19.910: I/DEBUG(28):     47285c3c  42ab4edd
    /data/dalvik-cache/system@framework@framework.jar@classes.dex
02-19 09:41:19.910: I/DEBUG(28):     47285c40  47285c48
02-19 09:41:19.910: I/DEBUG(28):     47285c44  00000001
02-19 09:41:19.910: I/DEBUG(28):     47285c48  00000001
02-19 09:41:19.910: I/DEBUG(28):     47285c4c  00000007
02-19 09:41:19.910: I/DEBUG(28):     47285c50  df002777
02-19 09:41:19.920: I/DEBUG(28):     47285c54  e3a070ad
02-19 09:41:19.920: I/DEBUG(28): #00 47285c58  44ebe8a0
    /dev/ashmem/mspace/dalvik-heap/2 (deleted)
02-19 09:41:19.920: I/DEBUG(28):     47285c5c  0012a0f8  [heap]
02-19 09:41:19.920: I/DEBUG(28):     47285c60  418ab254
    /dev/ashmem/dalvik-LinearAlloc (deleted)
02-19 09:41:19.920: I/DEBUG(28):     47285c64  00127174  [heap]
02-19 09:41:19.920: I/DEBUG(28):     47285c68  47285c70
02-19 09:41:19.920: I/DEBUG(28):     47285c6c  47285cd4
02-19 09:41:19.930: I/DEBUG(28):     47285c70  000000f0
02-19 09:41:19.930: I/DEBUG(28):     47285c74  00127128  [heap]
02-19 09:41:19.930: I/DEBUG(28):     47285c78  000000e4
02-19 09:41:19.930: I/DEBUG(28):     47285c7c  0012a0f8  [heap]
02-19 09:41:19.930: I/DEBUG(28):     47285c80  00000001
02-19 09:41:19.930: I/DEBUG(28):     47285c84  00000007
02-19 09:41:19.930: I/DEBUG(28):     47285c88  00000001
02-19 09:41:19.941: I/DEBUG(28):     47285c8c  ad040a89  /system/lib/libdvm.so
02-19 09:41:19.941: I/DEBUG(28):     47285c90  00000000
02-19 09:41:19.941: I/DEBUG(28):     47285c94  0012a0f8  [heap]
02-19 09:41:19.941: I/DEBUG(28):     47285c98  ad07ecc0  /system/lib/libdvm.so
02-19 09:41:19.941: I/DEBUG(28):     47285c9c  ad03775b  /system/lib/libdvm.so
02-19 09:41:19.941: I/DEBUG(28):     47285ca0  ad037745  /system/lib/libdvm.so
02-19 09:41:19.941: I/DEBUG(28):     47285ca4  47285d2c
02-19 09:41:19.941: I/DEBUG(28):     47285ca8  47285cd0
02-19 09:41:19.941: I/DEBUG(28):     47285cac  00127128  [heap]
02-19 09:41:19.941: I/DEBUG(28):     47285cb0  00000000
02-19 09:41:19.941: I/DEBUG(28):     47285cb4  00000001
02-19 09:41:19.950: I/DEBUG(28):     47285cb8  00000000
02-19 09:41:19.950: I/DEBUG(28):     47285cbc  00000000
02-19 09:41:19.950: I/DEBUG(28):     47285cc0  00000000
02-19 09:41:19.950: I/DEBUG(28):     47285cc4  ac065dd0
    /system/lib/libskia.so
02-19 09:41:19.950: I/DEBUG(28): #01 47285cc8  00000000
02-19 09:41:19.950: I/DEBUG(28):     47285ccc  00000000
02-19 09:41:19.950: I/DEBUG(28):     47285cd0  00000000
02-19 09:41:19.950: I/DEBUG(28):     47285cd4  afe0f2c0  /system/lib/libc.so
02-19 09:41:19.950: I/DEBUG(28):     47285cd8  47285d28
02-19 09:41:19.950: I/DEBUG(28):     47285cdc  00000000
02-19 09:41:19.950: I/DEBUG(28):     47285ce0  00000000
02-19 09:41:19.950: I/DEBUG(28):     47285ce4  00000000
02-19 09:41:19.950: I/DEBUG(28):     47285ce8  00127128  [heap]
02-19 09:41:19.960: I/DEBUG(28):     47285cec  afe0f3b0  /system/lib/libc.so
02-19 09:41:19.960: I/DEBUG(28):     47285cf0  00000000
02-19 09:41:19.960: I/DEBUG(28):     47285cf4  afe0f2c0  /system/lib/libc.so
02-19 09:41:19.960: I/DEBUG(28):     47285cf8  00000003
02-19 09:41:19.960: I/DEBUG(28):     47285cfc  afe3b9bc
02-19 09:41:19.960: I/DEBUG(28):     47285d00  00137e18  [heap]
02-19 09:41:19.960: I/DEBUG(28):     47285d04  47285d2c
02-19 09:41:19.960: I/DEBUG(28):     47285d08  00127128  [heap]
02-19 09:41:19.960: I/DEBUG(28):     47285d0c  00000003
02-19 09:41:19.960: I/DEBUG(28):     47285d10  ffffffff
02-19 09:41:19.960: I/DEBUG(28):     47285d14  47285d88
02-19 09:41:19.960: I/DEBUG(28):     47285d18  42f0cd88
02-19 09:41:19.970: I/DEBUG(28):     47285d1c  42f0cd74
02-19 09:41:19.980: I/DEBUG(28):     47285d20  0012a0f8  [heap]
02-19 09:41:19.980: I/DEBUG(28):     47285d24  ac06414c  /system/lib/libskia.so
02-19 09:41:21.230: D/Zygote(30): Process 224 terminated by signal (11)
02-19 09:41:21.230: I/WindowManager(52): WIN DEATH:
    Window{44d330a0 Just a sec! paused=false}
02-19 09:41:21.240: I/ActivityManager(52): Process
    com.roundwoodstudios.comicstripitpro (pid 224) has died.
02-19 09:41:21.250: I/WindowManager(52): WIN DEATH: Window{44d72738
    com.roundwoodstudios.comicstripitpro/
        com.roundwoodstudios.comicstripit.SceneActivity paused=false}
02-19 09:41:21.320: I/UsageStats(52): Unexpected resume of com.android.launcher
    while already resumed in com.roundwoodstudios.comicstripitpro
Yep, that's a seg-fault of the Dalvik VM triggered in the libskia library (Android's graphics lib), so I'm pretty screwed here - there's no catch and recover strategy for that! I've tried all sorts of things to try to work around it for Eclair, but so far no joy.
I got quite a few hits on StackOverflow for similar problems. Most seemed to be related to calling recycle, but I often hit the problem even before I recycle - I get blow-outs when creating Bitmaps (and yes, I'm still well within the VM budget, and I even tried allowing a 64Mb heap per app).
This looks like a monstrous bug in Android-2.1 to me. If I can't work around it I'll refund my user (he's a user of the paid version), but I doubt if that will lead to recovery of my previously 4.8 star rating.
Did I mention that I thought the rating mechanism was pretty harsh on developers? :(
Update - a few hours later :)
After some more debugging, I isolated the problem and created the simplest re-construction possible. The following code crashes reliably under API level 7, but runs to completion under API level 8 or above:
package com.roundwoodstudios.bitmaptest;

import android.app.Activity;
import android.graphics.Canvas;
import android.graphics.Color;
import android.os.Bundle;
import android.util.Log;

public class BitmapActivity extends Activity {
    @Override
    public void onCreate(Bundle savedInstanceState) {
        super.onCreate(savedInstanceState);
        setContentView(R.layout.main);

        for (int i=0; i<100; i++) {
            Log.i("Bitmap Test", "Iteration: " + i);
            Canvas _c = new Canvas();
            _c.drawColor(Color.WHITE);
        }
    }
}
When you look at it like that its fairly clear what's wrong: the canvas isn't really initialised properly yet - it doesn't know how large it is, for example. If I set a bitmap to it first it runs fine even under API level 7:
package com.roundwoodstudios.bitmaptest;

import android.app.Activity;
import android.graphics.Bitmap;
import android.graphics.Canvas;
import android.graphics.Color;
import android.os.Bundle;
import android.util.Log;

public class BitmapActivity extends Activity {
    @Override
    public void onCreate(Bundle savedInstanceState) {
        super.onCreate(savedInstanceState);
        setContentView(R.layout.main);

        for (int i=0; i<100; i++) {
            Log.i("Bitmap Test", "Iteration: " + i);
            Canvas _c = new Canvas();
            Bitmap _b = Bitmap.createBitmap(350, 350, Bitmap.Config.ARGB_8888);
            _c.setBitmap(_b);
            _c.drawColor(Color.WHITE);
        }
    }
}
Phew, that's a relief :)
Comment on this postPaths and Selections in Gimp
As I mentioned in my previous post, I've been learning to use Gimp so I can produce icons for my apps. The most significant new finding for me has been the discovery of paths and how to use them in combination with selections.
The ability to use set operations to combine selections in different ways, and to remember selections as paths opens up a whole world of possibilities. Lets look at a really simple example:
Fire up the Gimp, and create a new image to work on. I'm going with a 512x512 canvas again. Choose the oval selection tool and draw an oval on your canvas, then hold down shift and draw another oval that overlaps the first a little. (I was already surprised that I could add to the selections like this actually!)

Now, in the "Layers, Channels, Paths, .." window, open the paths tab, and click the "Selection to Path" icon (red circle with black lines above and below). You'll see a new entry added in the palette for your current selection shape. Here's how mine looks at this point:

There are immediately some neat things we can do:
- We can recreate this same selection at any time by selecting the path in the paths palette and clicking the "path to selection"" icon (the red square icon with dotted outline).
- We can "Stroke" this path (draw around its outline), using the currently selected tool, brush and colour, by clicking the paint-brush icon on the paths panel.
- We can add to or subtract from this selection using other selections, by drawing a new selection then holding down shift/ctrl/shift+ctrl and clicking the "path to selection" icon.
- We can add hand-drawn shapes to our path by using the path tool to create them, then adding them to a selection as described above.
One thing I found very useful, is that you can convert text to a path, which allows you to get creative with the stroke and fill used on that text. I'm going to clear my canvas and add some text:
- Select the text tool, click on the canvas and enter some text (I went with "Hello!")
- Increase the font size so that the text just fits on the canvas (I'm using Trebuchet MS bold italic at 175px). You might have to grab the corners of the text selection and expand it so that you can see all of the text.
- Move the text into the centre of the canvas.
- On the tool window, in the section at the bottom containing the tool controls, look for a button that says "Path from Text" - should be right at the bottom. Click it.
- Open the paths dialog again (from the layers, channels, paths.. window) - you should see that you now have a path called "Hello!", which looks like an outlined version of your text.
Now you can stroke and fill your text, convert it to a selection (allowing you to paint only inside or only outside), and generally do all kinds of neat things. For example:
- Switch to the "layers" dialog, and delete the floating text layer.
- Switch back to the "Paths" dialog again, click the "path to selection" icon
- Pick a nice colour to outline your text with (I've selected a deep blue)
- Invert your selection (ctrl-i) - this is so that we only paint around the outside in the next step
- From the "Paths" dialog, click the stroke icon
- In the dialog that pops up, set the stroke width to be around 10. Because we are stroking the line at the edge of the selection, half of the stroke width falls inside the text outline and will not be painted because it isn't part of our current selection. Click OK to stroke the path.

Now lets paint a gradient inside our text:
- From the "paths" dialog, click the "path to selection" icon
- From the tool palette, select the gradient tool
- Choose a foreground and background colour for the end-colours of your gradient (I'm going with red and yellow)
- Click and hold the left button in the "H" of your text, then drag over to the "!" before letting go of the button. A gradient will be painted inside your text outline only.

Creating comic-book style icons with Gimp
I've long had a love-hate relationship with Gimp. I hate the MDI interface - all those windows really grate on my nerves. I love that its a really great and full-featured graphics package, and free.
In the past I've fired it up to do all kinds of little jobs, but never really tried to use it to compose artwork of any complexity from scratch. That changed recently when I needed to create some nice icons for my Android app Comic Strip It!.
Finally, and almost by accident, I've learned how to use paths, masks, and layers, as well as a few of the filters, and managed to turn out some icons that I'm not too embarrassed by! Here's some examples:
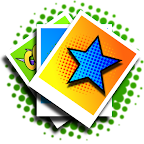


Since the app is all about creating comic strips I wanted icons that really fit with that idea, so I spent some time looking at comics and comic graphics.
The half-tone effect - coloured dots printed in rows at different sizes and angles to create the illusion of different shades of colour - figures heavily in print comic-books, and has a such a recognisable stylistic effect that I settled on using that as much as possible. My attempts at re-creating it aren't "real" half-tones, but I think the effect works.
A few working practices
I drew all my icons at 512x512 pixels, then re-scaled for use. Android wants 4 different sizes to cater for four different screen densities (low - 32x32, medium - 48x48, high - 72x72, extra-high - 96x96).
Drawing at the much larger size of 512x512 just makes it much easier to work, covers minor errors once you scale down, and means that you usually end up with a decent quality scaled image.
I save all the original icons using Gimp's native XCF file format, which retains the layers and masks and so on - this means I can always go back later and make small changes if I need to (and I did, many times).
Because my laptop runs Ubuntu I saved my icons in a folder shared by Ubuntu One (cloud backup and replication), but this didn't always work out well - connectivity issues on a few evenings meant that I got conflicting versions between my laptop and my desktop, and it wasn't too easy to sort out.
In future I will use git, as that puts control of when you update in your hands, and provides explicit versioning and access to old versions. I've upgraded to a paid github account now that my app is live in the Android Market, and all my source-code lives there now.
So, to the icons...
Creating a halftone background
Almost all of my icons use a circular splash of half-tone colour as a background. It took me a good long time to figure out how to do this properly, but once you know how its done its actually very quick to re-create.
Step 1: The background gradient
First, create a new 512x512 file, and paint a linear gradient filling the entire image. To paint a gradient:
- select the "blend" tool, and make sure its send to "linear blend"
- select foreground and background colours as the start and end colours for your gradient
- hold down the left mouse-button in one corner of your image, move to the diagonally opposite corner and release the button to paint the gradient
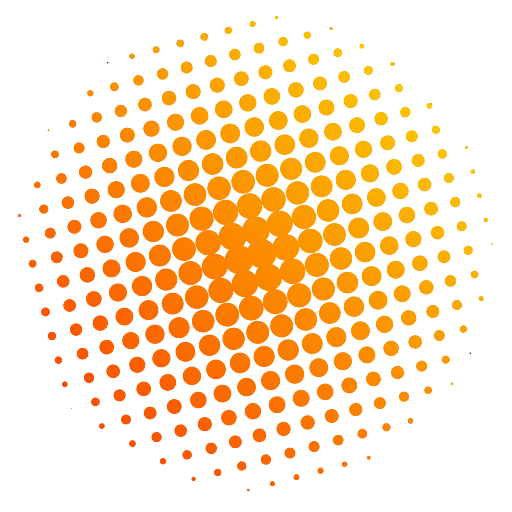
I picked a deep orange foreground colour, a paler orange-yellow background colour, and drew the gradient from bottom-left to top-right, resulting in the following image:

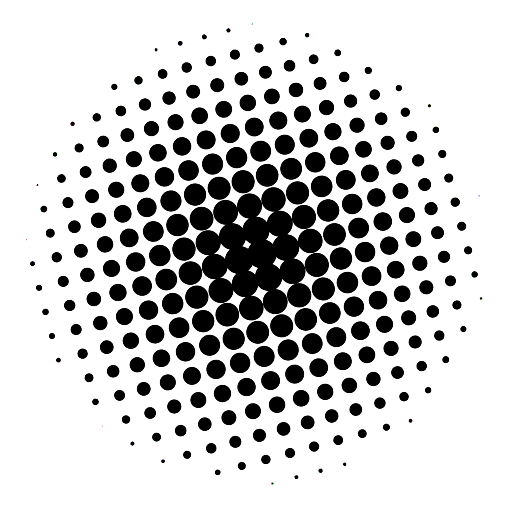
Step 2: The half-tone mask
To create the half-tone dot effect we're going to use one of Gimp's built in filters - "News-print". We want the dots to cluster heavily in the middle, then space further apart and get smaller the further they are from the centre of the image. Here's how we do that:
- Create a new layer, above the existing colour gradient. I like to do that directly in the "Layers" palette by right-clicking and choosing "New Layer", making sure to select "Transparency" as the layer fill type, and give it a name (I usually call this layer "bg_halftone").
- Make sure the layer is above your colour gradient in the layer palette. If it isn't, click and drag and drop it above the background layer.
- Select the "blend" tool again, and choose full black as the foreground colour, and full white as the background colour. This time we want to do a "radial blend".
- Move the mouse to the centre of your image, hold down the left button, and drag towards the right-hand edge. When you release the mouse you'll get a disc with a black centre, graduating through grey on a white background, as shown below.

Now we're going to convert the smooth black-to-white gradient of our disc to a half-tone effect. We'll do that using the News-print filter:
- From Gimp's "Filters" menu, choose "Distorts -> Newsprint"
- Increase the cell-size to something reasonably large - 25 to 30 works well if you're going to scale the final image down as I did. If you won't be scaling the image down, stick to something less than 10.
- Visit the three colour channel tabs (red/green/blue) and set the same angle in all of them. I'm using 15 in this example.
- Finally, set the anti-aliasing oversample to 15, and apply the filter.
Step 3: Allowing the colour to shine through the mask
Almost done! We just need to let the colour shine through from the background layer. I tried various ways of doing this. Masks worked well, and "Select->By Color" isn't bad (but does'nt capture anti-aliased areas perfectly). Eventually I got into the habit of a much simpler way:
- From Gimp's "Colors" menu choose "Color to Alpha"
- Click the colour-box (from:) and select full black
- Click OK and you'll see your background gradient shine through the dots
Note: If you noticed that the dots don't quite match up between the following image and the others on this page, its because I added this image after I originally posted, and had to re-create it because I had already deleted the .xcf file I originally used while writing this post. Oops.
For completeness, here's the "Select->By Color" method, which I don't use any more because it involves more steps and leaves the dots with slightly jagged edges:
- From Gimp's "Select" menu, choose "By Color", and then select the white background of the image.
- Invert the selection (ctrl-i) so that the black dots are now selected. (We could have selected the black dots initially, but I find that if you do this you end up with black artefacts after the next step)
- From the "Edit" menu choose "Clear", or hit the delete key, if you have one (my laptop doesn't). You should now see the gradient colour from your background layer shining through the holes you just made in the top-most layer.
- De-select (ctrl-a) and merge the two layers (right-click in the layers palette and choose "merge visible..")
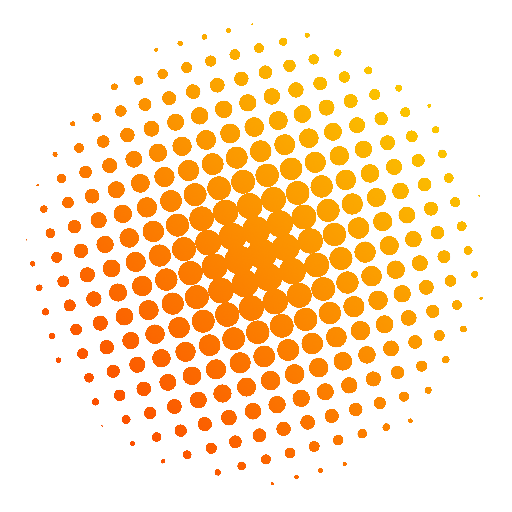
Notice that the edges of the dots in this version of the image are decidedly jagged, compared to the version created by using the colour-to-alpha technique. This is to do with the select-by-colour method not including anti-aliasing pixels that are closer to white than black in the selection.
Step 4: Optional - de-focus for use as a background
I used this technique to create the backgrounds for my icons, adding one more step: gaussian blur to de-focus the background and make the foreground icon stand out nice and sharp.
I used the same technique to pattern-fill the icon detail by using paths and selections. I'll save the details of that for another post.
Comment on this post