

Creating iOS style icons with ImageMagick
Icons for iOS apps are generally provided by the app with square corners and no "sheen". The rounded corners and glossy sheen are added by iOS.
If you want to achieve the iOS icon look on icons used elsewhere (Android, Web, etc), you need to round the corners and apply the sheen yourself.
What follows is my quick attempt to give the iOS treatment to this 512x512 icon:

Transparent Rounded Corners
OK, transparent rounded corners are actually the easy part. There are several ways to get ImageMagick to do this. The easiest (read: shortest) command i've found looks like this:
convert -size 512x512 xc:none -fill white -draw \
    'roundRectangle 0,0 512,512 50,50' in.png \
    -compose SrcIn -composite rounded.png
So now we have this:

Overlay some sheen
The sheen is trickier. I imagine that real ImageMagick pro's could generate the sheen mask with some deft command-line, but I'm nowhere near that proficient.
Instead I created the following image in Gimp - exactly how is a topic for another post :). The black background is coming from the div containing the image - where you see black is actually transparent in my png, and the grey highlight at the top is semi-transparent:

To composite the rounded-corner image with the glossy overlay (gloss-over.png), I use this ImageMagick command:
convert -draw "image Screen 0,0 0,0 'gloss-over.png'" \
    rounded.png final.png

Invoking Processes from Java
Invoking an external process from Java appears easy enough but there are sooo many gotchas to watch out for. Typical problems that arise include:
- Hanging Processes - The invoked process "hangs" and never completes (because it is waiting for input that never comes, or for the output buffer(s) to be drained).
- Failure to execute - Commands that work fine from the cmdline refuse to run when invoked from Java (because the parameters are passed incorrectly).
- Mysterious issues in production - Peculiar situations where processes cease to work after running happily for some time (the file-handle quota is exhausted because the IO streams are not being correctly closed).
The first two are irritating, but at least they present themselves immediately and are typically fixed before the code leaves the developer.
The last problem is much more insidious and often only rears its head after some time in production (sometimes this is because it takes time and a significant number of executions before it manifests, other times it is because of differences between the development and production environments).
Lets have a look at the general solution to each of these problems. Later I'll list some code that I've been using to invoke processes safely.
Hanging Processes
Symptoms: When invoked, the process starts but does not complete. Sometimes this may appear to be caused by the input that is being fed to the process (e.g. with input A it works but with input B it does not), which adds to the confusion over why the problem occurs.
Cause: The most common reason for this problem is failing to pump input into the program, and drain output buffers from the program, using separate threads.
If a program is consuming sufficient input via standard-input (stdin), or producing sufficient output via stdout or stderr, the limited buffers available to it will fill up. Until those buffers are drained the process will block on IO to those buffers, so the process is effectively hung.
Solution: When you invoke any process from Java, you must use separate threads to pump data to/from stdin, stdout, and stderr:
// invoke the process, keeping a handle to it for later...
final Process _p = Runtime.getRuntime().exec("some-command-or-other");

// Handle stdout...
new Thread() {
    public void run() {
    try {
            Streams.copy(_p.getInputStream(), System.out);
        } catch (Exception anExc) {
            anExc.printStackTrace();
        }
    }
}.start();

// Handle stderr...
new Thread() {
    public void run() {
    try {
            Streams.copy(_p.getInputStream(), System.out);
        } catch (Exception anExc) {
            anExc.printStackTrace();
        }
    }
}.start();
Correctly pumping data into and out of the std io buffers will keep your processes from hanging.
Failure to communicate
Symptoms: You have a command-line that works perfectly when executed at the shell prompt, but invoking it from Java results in strange errors and, perhaps, complaints about invalid parameters.
Cause: Typically this occurs when you try to pass parameters which include spaces - for example file-names - which you escape or quote at the shell prompt.
Example: Running ImageMagick "convert" to add transparent rounded corners to an icon:
convert -size 72x72 xc:none -fill white -draw \
  'roundRectangle 0,0 72,72 15,15' in.png \
  -compose SrcIn -composite out.png
This command-line works fine at a bash prompt, but if you try to invoke it naively from Java it will likely fail in a variety of interesting ways depending on your platform:
public static void main(String... anArgs) {
    // invoke the process, keeping a handle to it for later...
    final Process _p = Runtime.getRuntime().exec(
        "/usr/bin/convert -size 72x72 xc:none -fill white -draw" +
        " 'roundRectangle 0,0 72,72 15,15' /home/steve/Desktop/in.png" +
        " -compose SrcIn -composite /home/steve/Desktop/out.png"
    );

    // Handle stdout...
    new Thread() {
        public void run() {
            try {
                Streams.copy(_p.getInputStream(), System.out);
            } catch (Exception anExc) {
                anExc.printStackTrace();
            }
        }
    }.start();

    // Handle sderr...
    new Thread() {
        public void run() {
            try {
                Streams.copy(_p.getErrorStream(), System.out);
            } catch (Exception anExc) {
                anExc.printStackTrace();
            }
        }
    }.start();

    // wait for the process to complete
    _p.waitFor();
}
Whilst the command-line worked fine at the bash prompt, running the same command from Java results in an error message!:
convert: non-conforming drawing primitive definition
    `roundRectangle' @ error/draw.c/DrawImage/3143.
convert: unable to open image `0,0':  @ error/blob.c/OpenBlob/2489.
convert: unable to open image `72,72':  @ error/blob.c/OpenBlob/2489.
convert: unable to open image `15,15'':  @ error/blob.c/OpenBlob/2489.
convert: non-conforming drawing primitive definition
    `roundRectangle' @ error/draw.c/DrawImage/3143.
What's going on!? Basically the command we gave to Runtime.exec has been sliced up at spaces, ignoring the single quotes, and so ImageMagick has seen a very different command-line to the one we presented via the shell.
Solution: The solution this time is very easy: Use the overloaded Runtime.exec(..) methods that accept the command and the parameters as an array of String's. Re-writing our previous example:
public static void main(String... anArgs)
throws Exception {
    // invoke the process, keeping a handle to it for later...
    // note that we pass the command and its params as String's in
    // the same String[]
    final Process _p = Runtime.getRuntime().exec(
        new String[]{
            "/usr/bin/convert",
            "-size", "72x72", "xc:none", "-fill", "white", "-draw",
            "roundRectangle 0,0 72,72 15,15",
            "/home/steve/Desktop/in.png", "-compose", "SrcIn",
            "-composite", "/home/steve/Desktop/out.png"
        }
    );

    // Handle stdout...
    new Thread() {
        public void run() {
            try {
                Streams.copy(_p.getInputStream(), System.out);
            } catch (Exception anExc) {
                anExc.printStackTrace();
            }
        }
    }.start();

    // Handle sderr...
    new Thread() {
        public void run() {
            try {
                Streams.copy(_p.getErrorStream(), System.out);
            } catch (Exception anExc) {
                anExc.printStackTrace();
            }
        }
    }.start();

    // wait for the process to complete
    _p.waitFor();
}
Passing your cmdline parameters in a String array instead of as one long String should prevent your parameters from being chewed up and mis-interpreted.
Mysterious issues in production
Symptoms: For a good while things appear to be working fine. Processes are invoked, do their work, and shut-down. After a while a problem occurs - the processes are no longer being invoked, or hang.
Cause: The cause of this is usually exhaustion of the available file-handles, which in turn is caused by failing to correctly close all of the IO streams opened to handle the process IO.
Solution: Careful closure of all standard IO streams opened by the process and streams opened by you to consume the data from the standard streams opened by the process. Note: That's SIX streams in total, not just the three that you open to deal with stdin, stdout and stderr! I also recommend calling destroy on the Process object.
I may be being over-cautious in closing the process's own std streams, but I have seen many cases where closing these streams solved problems of leaked file-handles. (btw., A handy tool if you're running a *nix is lsof, which lists open file handles).
Here's how I recommend cleaning up after your process completes (this assumes that you did provide input via stdin):
public static void main(String... anArgs) {
    Process _process = null;
    InputStream _in = null;
    OutputStream _out = null;
    OutputStream _err = null;
    try {
        _process = Runtime.getRuntime().exec( ... );
        // ... don't forget to initialise in, out, and error,
        // .... and consume the streams in separate threads!
        _process.waitFor();
    } finally {
        if( _process != null ) {
            close(_process.getErrorStream());
            close(_process.getOutputStream());
            close(_process.getInputStream());
            _process.destroy();
        }
        close(_in);
        close(_out);
        close(_err);
    }
}

private static void close(InputStream anInput) {
    try {
        if (anInput != null) {
            anInput.close();
        }
    } catch (IOException anExc) {
        anExc.printStackTrace();
    }
}

private static void close(OutputStream anOutput) {
    try {
        if (anOutput != null) {
            anOutput.close();
        }
    } catch (IOException anExc) {
        anExc.printStackTrace();
    }
}
These days I usually use some utility classes which I've written to wrap all this stuff up and make life a little easier. You can find them in my sjl.io project at github. There's an example of usage in the test source tree - ExternalProcessTest - which invokes ImageMagick.
Another mini-figure, another comic strip...
Here's a quick taster of the new speech-balloon styles and colours available in Comic Strip It! v1.4.2 (and featuring my latest lego minifigure - the Mad Scientist).

| Sorry iOS folks, Comic Strip It! is only available for Android at this time. Android folks can jump to the Market with this QR code. |  |
Maven, Android and Eclipse - joining the team
I blogged recently about building Android projects with Maven, and how we've set things up for team development using Maven, Android and Eclipse. This follow up post describes how someone joining the team would go about setting up and getting to work...
To join in the fun you need a straight-forward installation of the following pre-requisite tools:
- Eclipse (I usually go for Eclipse classic)
- Subversion
- Maven 3.0.3
- Android SDK
You will then need the following Eclipse plugins:
- Android Development Tools (ADT) - update site: https://dl-ssl.google.com/android/eclipse/
- m2eclipse - update site: http://download.eclipse.org/technology/m2e/releases
- m2e-android - Whilst you can install this like a normal plugin (thx Ricardo for the correction), I recommend that you don't use an update site to install this - instead, follow the instructions at the bottom of this post (after the comic), or at the m2e-android site.
Since you are setting up to join an existing team, most of the maven configuration has presumably already been done for you. To get working on a project (assuming it is set up as I described) you need to check out two projects:
- The "parent" project containing the common configuration for all Android-Maven projects
- The project you actually need to work on
- (OK, yes, also any apklib library projects if you need to debug or work on those too)
I highly recommend checking out so that all of these projects are siblings in a common projects directory.
The biggest single difference from ADT's usual working style is that you can't (currently) work with the apklib projects as project dependencies because of this issue. Instead, if you make any changes to an apklib project, you'll need to mvn install or mvn deploy it before you can see the change in your dependent apk projects.
I found that I had to "mvn install" each of the apklib projects locally before the dependent projects would build, as the remotely deployed projects for some reason did not include the pom resource - I haven't yet had time to investigate why.

Installing M2E-Android
Don't install this like a normal Eclipse feature! To install M2E-Android, open an Android-Maven project and open the pom.xml. You should see that the apk or apklib packaging types.
In the header of the pom.xml editor you should see a red error message: plugin execution not covered by lifecycle configuration....
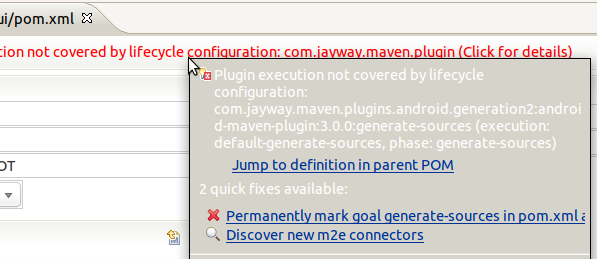
Click the error and some details open up, including two quick fixes. Click the first quick fix ("discover new m2e connectors"). The following dialog pops up and after a short search, shows the m2e-android connector:
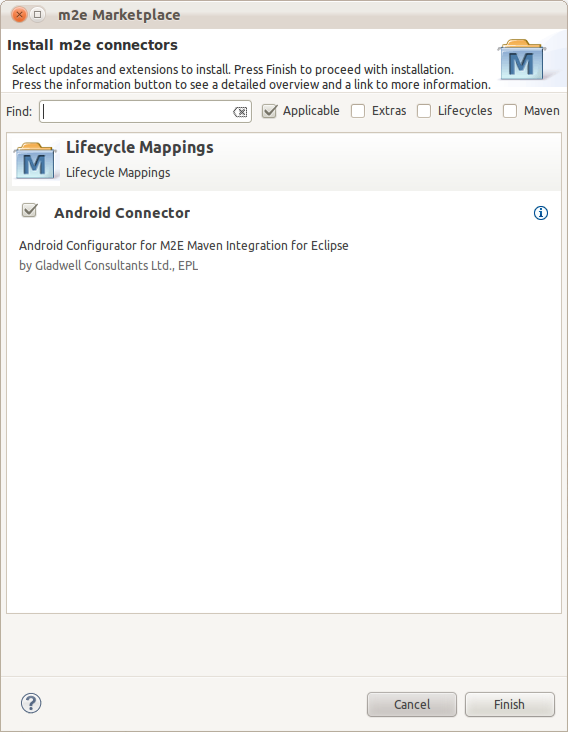
Install the connector and the warnings should go away. Actually on one of my two machines they did not - I don't know why, but I had to take the 2nd quick-fix option of turning it off in Eclipse. For me that's just about ok, as I want the maven build to be the master anyway.
Comment on this postCreating colourised icon theme-sets with Image-Magick
While automating production of customised applications I needed to automatically create a set of icons that match the colour scheme selected by the customer. This article describes some of my experiments (details follow the strip...).

My aim was to find a way to take a target colour and re-create the entire icon set matched as closely as possible to that input colour, using a single command-line.
Lets start with a quick look at a sample icon - this was created by our UX designer and used in building the proto-typical instance of the application. It is part of a set of around 30:
![]()
Given that I want to be able to apply a colour selected by a customer, I need to start from a neutral state, so my first step is to de-colourise the original icon, producing this grey-scale version:
![]()
Note that the icons all have transparency, but otherwise are largely made from shades of a single colour (a gradient) with white highlights.
I started by looking at the simple built-in image-magick commands. Given that I'm converting a large batch of icons I'm using mogrify instead of convert, which also requires that the command-line is re-ordered slightly, for example:
convert in.png -brightness-contrast 20x20 out.png
becomes:
mogrify -brightness-contrast 20x20 *
My first attempts used the Image-Magick commands tint, colorize, and +level-colors individually, as I was hoping for a very simple solution to present itself. Let's look at what each of those commands produces if we try to create icons with the following base colour:
mogrify -fill "#0000cc" -tint 100 *
![]()
mogrify -colorize 100,0,0 *
![]()
mogrify +level-colors "#000066","#0000cc" *
![]()
As you can see from those examples, tint does the best job of retaining the fidelity of the icon, but doesn't really get close to the target colour.
Colorize has also kept most of the fidelity, but the white foreground has tended towards the target blue colour along with the grey background parts, though neither has really got very close to our intended colour.
+level-colors has got us closer to our target colour, but we've almost completely lost the white and the fidelity of the icon is, as a result, pretty much destroyed.
Reduce and re-compose
OK, so we can't get there with a simple one-liner. What about if we strip out different aspects of the image, perform different operations on each composite part, and then re-combine them later?
This is ultimately what I ended up doing:
- Extract the white part only
- Brighten the grey part (helps the later stages to get closer to the target colour)
- Adjust the grey (background) part towards our target colour
- Composite the white foreground back over the re-coloured background
Here's the commands to achieve that (note: I switched to using convert instead of mogrify because it was easier to test incremental changes this way):
# extract the white parts
convert -fuzz 60% -transparent black in.png 2.png

# lighten the original image
convert in.png -brightness-contrast 20x0 3.png

# level colours ...
convert +level-colors "#000066","#0000cc" 3.png

# composite together ...
convert 3.png 2.png in.png -composite out.png
It shouldn't be too difficult to follow that.
The first command extracts the white-ish parts of the image (foreground) by making shades of grey - from black through 60% grey - transparent. The fuzz factor is what determines the cut-off point. We produce this white-foreground as a separate image (2.png) because we still need the original for later steps.
Next we create a 3rd image (background) as a lightened version of the original (3.png) then colourise it using the +level-colors command we used earlier.
Finally we composite together the background image as the base, the foreground image on top, and use the original image as a mask so that we don't lose the transparency. The final result looks like this:
![]()
This is the best I've managed so far with my rudimentary knowledge of ImageMagick.
Since I'm invoking this conversion from a Java process I think I'll try something a little more low-level in Java next. I want the fidelity of the "tint" operation, with the precise colour targeting of the composite approach, I just don't know how to get there with ImageMagick.
Comment on this post