

Weighted Average smoothing with Java2d
Since my original post I've done a little bit more playing with processing images to try to give them a "vectorised" look. I really didn't change much, just played with the algorithm for choosing pixel colour. The algorithms all work by examining the colours of the current and surrounding pixels to determine what colour to paint the current pixel. The colour selection is performed by classes that implement the following simple interface:
interface Counter {
    // add a colour channel value for one of
    // the neighbouring pixels
    public void add(int aValue);

    // calculates the value we should use
    // for the current colour channel of the
    // current pixel based on its neighbours
    public int mostFrequent();
}
The client code that deals this interface invokes the add method 3 times for each pixel - once for each colour channel (red / green /blue). The client code looks like this:
// calculate the colour
private int count(int anOffset, int[] aSurrounding) {
    Counter _c = getCounter();
    int _length = aSurrounding.length-(2-anOffset);
    for (int i=anOffset; i<_length; i+=3) {
        _c.add(aSurrounding[i]);
    }
    return _c.mostFrequent();
}
Here you can see that I can easily supply different implementations of Counter, so I can try different algorithms easily.
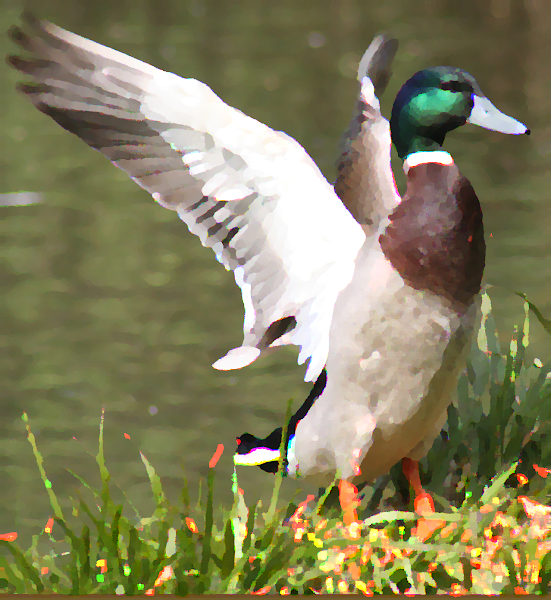
The original colour-selection algorithm
The original algorithm simply takes the most frequent value of each colour channel so that, for example, if 51% of the surrounding pixels are bright blue, and the other 49% are bright red, this pixel will be bright red.
class SimpleCounter implements Counter {
    int[] values = new int[256];

    public SimpleCounter() {
        Arrays.fill(values, -1);
    }

    public void add(int aValue) {
        values[aValue] += 1;
    }

    public int mostFrequent() {
        int _highest = -1;
        int _colour = -1;
        for (int i=0; i<256; i++) {
            if (values[i] > _highest) {
            _highest = values[i];
            _colour = i;
            }
        }
        return _colour;
    }
}
This algorithm does produce the effect I'm looking for, but I get some sharp edges and colour bleeding that I don't really want (see example output below).
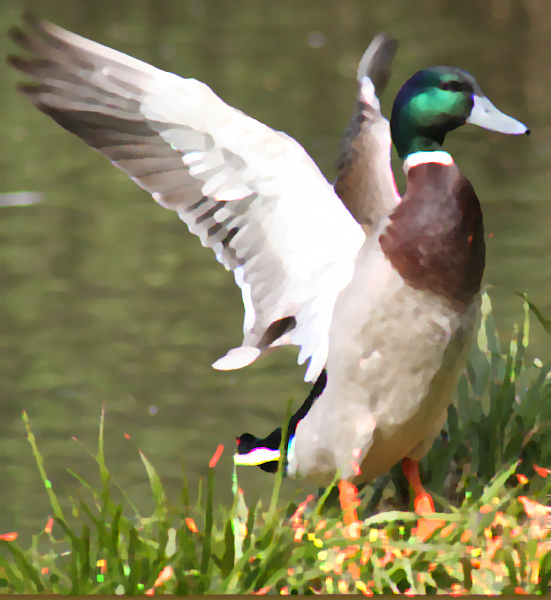
The weighted-average algorithm
This algorithm weights the values of the surrounding pixels relative to the most common value, so we get a weighted average that does take some account of less popular colours in the neighbourhood of the current pixel.
class WeightedAverageCounter implements Counter {
    int[] values = new int[256];

    public WeightedAverageCounter() {
        Arrays.fill(values, 0);
    }

    public void add(int aValue) {
        values[aValue] += 1;
    }

    public int mostFrequent() {
        int _max = max();
        double _weight=0, _colour=0, _count=0;
        for (int i=0; i<256; i++) {
            if (values[i] > 0) {
                _weight = (((double)values[i]) / _max);
                _weight = Math.pow(_weight, 5);
                _colour += _weight * i;
                _count += _weight;
            }
        }
        return (int) (_colour / _count);
    }

    private int max() {
        int _highest = 0;
        for (int i=0; i<256; i++) {
            if (values[i] > _highest) {
                _highest = values[i];
            }
        }
        return _highest;
    }
}
The result of the weighted average algorithm is a much smoother colour composition with a reduction in the aliasing effects that can be seen in the more simple algorithm's output. It does have a significant performance penalty however - on my quad core i7 laptop on an image of 600x650 pixels and a 16x16 neighbourhood, the simple algorithm completes in 10 seconds, whereas the weighted-average needs 90 seconds!
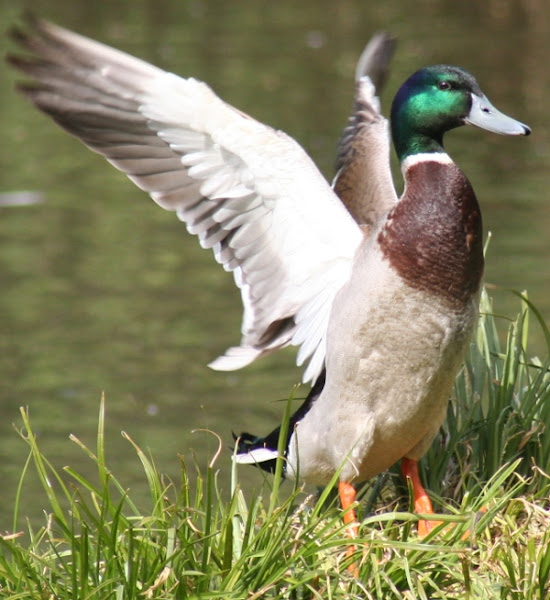
Output for comparison
Here are some examples for comparison. First is the original image, then then the image processed with the simple colour selection algorithm, followed by the weighted average algorithm.
It might be a little difficult to see the difference, so here's one final composite image showing the difference close-up and side-by-side
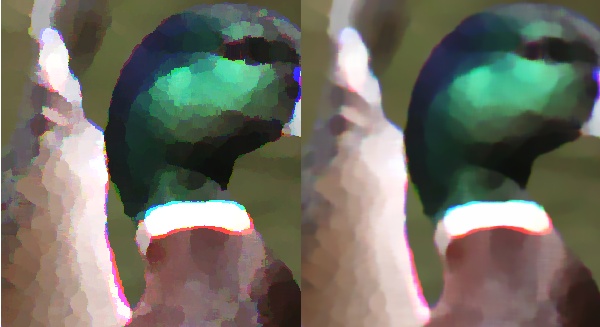
The left-side shows the image processed with the simple algorithm, whilst the right-side shows the smoother result of the weighted-average algorithm.
blog comments powered by Disqus