

Converting Eclipse ADT Android projects to build with Maven
Getting Android Development Tools (ADT) for Eclipse to play nicely with Maven is quite a fiddle, involving a bunch of plugins for both Eclipse and Maven. Here's how I got it working (details after the comic-strip...). You might also be interested in two follow posts - setting up for team development with Android, Maven and Eclipse and joining a team developing with Android, Maven and Eclipse:
Plugins, Tools and Dependencies
- The Maven-Android plugin is Maven-3.0.3+ only, so you'll need to upgrade Maven if you are running an older version. The good news for Maven-2 users is the Maven guys worked hard to make 3 backwards compatible - and so far I've had no problems on some pretty complex projects.
- Eclipse Helios (3.6) or Indigo (3.7)
- The Android Developer Tools and SDK (of course).
- The m2eclipse Eclipse plugin (supposedly not required with Eclipse Indigo, but I had to install it)
Setup and Configuration
First, install maven 3.0.3 (or whatever newer maven is available).
Next install the m2eclipse plugin (you might want to check if you have it already - Indigo is supposed to come pre-supplied, but that probably depends on which Eclipse bundle you install. I usually go with Classic, and did not have m2eclipse. YMMV).
Now update your android sdk:
- Using sdk manager, install all api levels you are interested in, including "google apis by google inc."
- note: be sure to accept the license agreement for each selected jar (the ? should change to a green tick for ALL).
- note: I find that the sdk manager either does not install all ticked packages in one go, or incorrectly reports the number of packages remaining to be installed - it "completes" but there are still pending installs (the "install N packages..." button re-enables with N > 0). I find it safest to restart SDK manager between each attempt so that it correctly shows what is installed.
If you want to work with Android 3 you need to perform an additional step. Maven Central does not have the jars available, so you'll need to use sdk deployer to push them into your repository.
- check out with git (git clone https://github.com/mosabua/maven-android-sdk-deployer.git)
- install android jars as required by running mvn from inside the sdk deployer project directory, example:
mvn install -P 1.6, or install the whole lot withmvn install if you have a shared / remote / central repository as we do, you will want to deploy the android jars there too. To do this you need to fill two fields in the android-sdk-deployer's pom.xml that the creator Manfred Moser helpfully separated out
<repo.id>kv-repository</repo.id>
<repo.url>scp://my-repo-host/repository</repo.url>
OK, we're done with installing!
Create your pom.xml
There are various ways you can create a pom for your existing Android projects. I went with the simple expedient of using mvn archetype:generate ...
- from a directory you are happy to create projects in, execute
mvn archetype:generate - you will be presented with an enormous list of archetypes - type android and hit return
- the list should have been filtered down to about 3 from "de.acquinet.android..."
- select "de.akquinet.android.archetypes:android-quickstart" - for me this was option 1
- follow the prompts to conclusion - this will create a simple android project, including the pom.xml for an apk project.
Once you've done that you can copy the pom to your existing project(s) and modify it manually - this is what I did.
(Note: If you are starting a fresh new project you can just run mvn clean eclipse:eclipse to generate the eclipse project and classpath, then "import" the project into eclipse. After importing your project will just appear as a normal java project (neither maven nor android natures will be ascribed). To remedy that, right-click your project, go to configure->convert to Maven project, both natures are added automatically and you're ready to rock'n'roll.)
Integrate Eclipse and Maven
OK, last part ... Getting Eclipse and Maven to play nicely.
If you open the project in Eclipse now you'll probably find that it doesn't like your pom.xml. When you open the pom with m2eclipse installed it will open with the graphical xml editor. You'll notice that there's an error plugin execution not covered by lifecycle configuration....
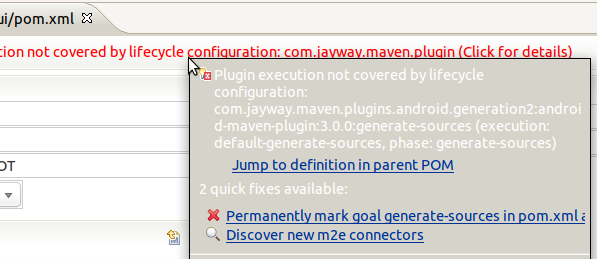
Click the error and some details open up, including two quick fixes. Click the first quick fix ("discover new m2e connectors"). The following dialog pops up and after a short search, shows the m2e-android connector:
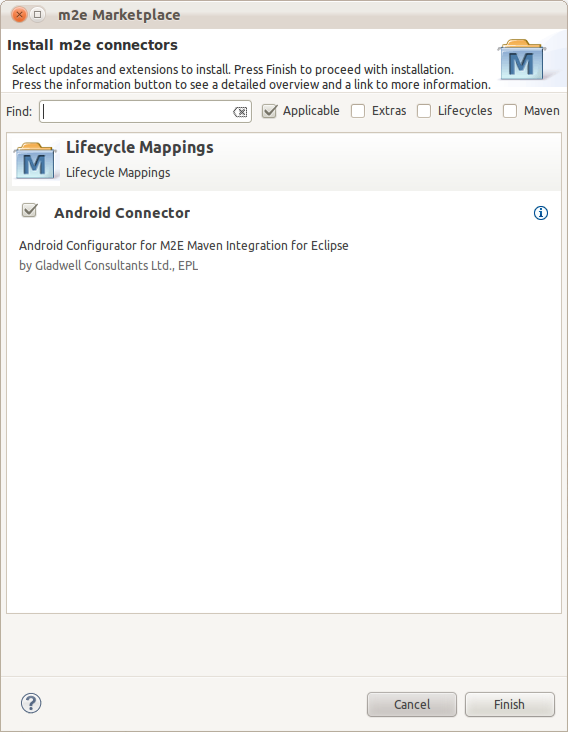
Install the connector and the warnings should go away. Actually on one of my two machines they did not - I don't know why, but I had to take the 2nd quick-fix option of turning it off in Eclipse. For me that's just about ok, as I want the maven build to be the master anyway.
Congrats, you should now have a happy Eclipse project, and be able to build it using maven as expected.
What about android library projects?
Well basically its the same deal. I actually started with the library projects. The main difference is