

Dynamic Proxies in Java
Dynamic Proxies are a fantastic tool to have in your kit, and pretty easy to get up and running with.
A Dynamic Proxy is just what the name suggests: a proxy to a "normal" Java class, where the proxy is created dynamically - at runtime - and can be substituted instead of the proxied class.
If that still doesn't make sense, hopefully the example below will clear it up.
Lets imagine we want to be able to time the execution of any method on any implementation of any interface. We don't know or care what the interface is. We'll do this by passing the class that implements the interface to an "InstrumentationService", whose interface looks like this:
public interface InstrumentationService {
    /**
     * @param aT - the object to be instrumented for monitoring
     * @return A polymorphically equivalent T which has been instrumented
     */
    public <T> T instrument(T aT);
}
We'll get to the implementation of InstrumentationService shortly, but for now it should be clear that to instrument a class is as simple as this:
private InstrumentationService instr;

public void doSomeStuff() {
    SomeInterface _si = new SomeClassThatImplementsIt();

    _si.doSomething(); // won't be timed

    _si = instr(_si);

    _si.doSomething(); // will be timed!
}
OK, so how can we implement InstrumentationService so that it can decorate arbitrary methods on as-yet-unknown interfaces? Enter Dynamic Proxies.
There are several rules and caveats to follow which I won't go into - they are documented pretty well here. For now it should suffice to say that you can only proxy interfaces (which is ok because you always program to interfaces / design by contract anyway, right?)
Here's an implementation of InstrumentationService that uses Dynamic Proxying:
package com.sjl.example;

import java.lang.reflect.*;
import java.util.*;
import java.util.concurrent.*;

public abstract class DynamicInstrumentationService
implements InstrumentationService {

    protected abstract void record(String anEvent, long aNanos);

    @SuppressWarnings("unchecked")
    @Override
    public <T> T instrument(final T aT)
    {
        return (T) Proxy.newProxyInstance(
            aT.getClass().getClassLoader(),
            aT.getClass().getInterfaces(),
            new InvocationHandler() {
                @Override
                public Object invoke(
                    Object aProxy, Method aMethod, Object[] aArgs)
                    throws Throwable
                {
                    long _start = System.nanoTime();
                    try {
                        return aMethod.invoke(aT, anArgs);
                    } catch (InvocationTargetException anExc) {
                        throw anExc.getCause();
                    } finally {
                        record(_t.event(), System.nanoTime()-_start);
                    }
                }
            });
    }
}
So what do we have here?
- An abstract implementation of IntrumentationService which defers the actual recording of the timed value to a concrete subclass - you could extend and implement the
recordmethod to log to stdout, for example. - The
instrumentmethod creates a new Dynamic Proxy around the given class by invokingProxy.newInstance. Notice that we use the classloader of the given class, and pass all of the interfaces it implements as types to be proxied. - The details of what to do when any method of the proxy is invoked are in the InvocationHandler, implemented here as an anonymous inner class. Its pretty simple - capture the clock time before the method is invoked; invoke the method; capture the clock time after the method completes; record the difference in time (after - before).
Notice that when we invoke the proxied class's method, we wrap the invocation with a try/catch that catches InvocationTargetException, and if such an exception is thrown we propagate its cause, not the InvocationTargetException itself. This is just unwrapping an uninteresting layer of exceptions (which we added by using reflection to invoke the method) to get to the real problem.
This is a pretty simple example of what you can do with Dynamic Proxies. Even with this simple example its clear that you could modify it to, for example, record separate timings for successful invocations vs those that throw exceptions, or to only record timings for methods with annotations (e.g. you might create an @Timed annotation), etc., etc.
I should mention that there is a down-side to Dynamic Proxies: they use reflection to invoke the method of the proxied class, so there is a small performance penalty.
Lately I've been having all kinds of fun with Dynamic Proxies, from instrumentation (somewhat more complex than the above example) to monitoring service health (by escalating through warning statuses based on the ratio of successful/exceptional completion).
My favourite use so far: asynchronous execution of synchronous service calls, returning the result as a disguised/implicit Future/Promise with a coordinated Service Level Agreement cut-off . . . yeah anyways, that's a blog post for another day :) (update 09-09-2012: see Implicit-Futures)
Comment on this postSetting up embedded Jetty 8 and Spring MVC with Maven
This is intended to be the first post in a series on building straight-forward web-apps with Spring-MVC and embedded Jetty. You can check out the complete source of this simple project from github.
This post describes configuring your Jetty and Spring MVC with XML-based configuration. If you want to use annotations/java-config take a look at this post.
Its been a while since I last posted. I've been busy starting up two big projects at work, one using Google App Engine (and Spring MVC ;)), the other using Jetty 8 (embedded), Spring MVC, MongoDB and ElasticSearch.
The Jetty/Spring combination is one which I've used before - several times since Jetty-5/Spring-1.2 - and I really like. You just can't beat it for quick debug cycles, complete control of the environment, minimal configuration, single-jar deployment, etc., etc.
On this most recent project I'm using jsp as the view technology - this is probably the easiest way to go since most things "just work" out of the box. Other view technologies can be used too - for example last year we used this same combination with FreeMarker - its just a little more effort to get things wired up right.
Here's how I set my projects up:
Maven POM
<?xml version="1.0" encoding="UTF-8"?>
<project
 xsi:schemaLocation="
 http://maven.apache.org/POM/4.0.0
 http://maven.apache.org/xsd/maven-4.0.0.xsd"
 xmlns="http://maven.apache.org/POM/4.0.0"
 xmlns:xsi="http://www.w3.org/2001/XMLSchema-instance">
<modelVersion>4.0.0</modelVersion>

<groupId>com.sjl</groupId>
<artifactId>webapp</artifactId>
<version>1.0-SNAPSHOT</version>
<name>WebApp</name>
<description></description>

<repositories>
  <repository>
    <id>springsource-repo</id>
    <name>SpringSource Repository</name>
    <url>http://repo.springsource.org/release</url>
  </repository>
</repositories>

<properties>
  <jetty.version>8.1.5.v20120716</jetty.version>
  <jetty.jsp.version>8.1.4.v20120524</jetty.jsp.version>
  <spring.version>3.1.2.RELEASE</spring.version>
</properties>

<build>
  <plugins>
    <plugin>
      <groupId>org.apache.maven.plugins</groupId>
      <artifactId>maven-source-plugin</artifactId>
      <version>2.1.2</version>
      <executions>
        <execution>
          <id>attach-sources</id>
          <phase>verify</phase>
          <goals>
            <goal>jar-no-fork</goal>
          </goals>
        </execution>
      </executions>
    </plugin>
    <plugin>
      <artifactId>maven-compiler-plugin</artifactId>
      <version>2.3.2</version>
      <configuration>
        <source>1.6</source>
        <target>1.6</target>
      </configuration>
    </plugin>
    <plugin>
      <artifactId>maven-eclipse-plugin</artifactId>
      <configuration>
        <downloadSources>true</downloadSources>
      </configuration>
    </plugin>
  </plugins>
</build>

<dependencies>

  <!-- SPRING DEPENDENCIES -->
  <dependency>
    <groupId>org.springframework</groupId>
    <artifactId>spring-context</artifactId>
    <version>${spring.version}</version>
  </dependency>
  <dependency>
    <groupId>org.springframework</groupId>
    <artifactId>spring-webmvc</artifactId>
    <version>${spring.version}</version>
  </dependency>

  <!-- JETTY DEPENDENCIES -->
  <dependency>
    <groupId>org.eclipse.jetty</groupId>
    <artifactId>jetty-server</artifactId>
    <version>${jetty.version}</version>
  </dependency>
  <dependency>
    <groupId>org.eclipse.jetty</groupId>
    <artifactId>jetty-servlet</artifactId>
    <version>${jetty.version}</version>
  </dependency>
  <dependency>
    <groupId>org.eclipse.jetty</groupId>
    <artifactId>jetty-webapp</artifactId>
    <version>${jetty.version}</version>
  </dependency>
  <dependency>
    <groupId>org.eclipse.jetty</groupId>
    <artifactId>jetty-servlets</artifactId>
    <version>${jetty.version}</version>
  </dependency>

  <!-- JSP and JSTL SUPPORT -->
  <dependency>
    <groupId>org.eclipse.jetty</groupId>
    <artifactId>jetty-jsp</artifactId>
    <version>${jetty.jsp.version}</version>
  </dependency>
  <dependency>
    <groupId>javax.servlet</groupId>
    <artifactId>jstl</artifactId>
    <version>1.2</version>
    <scope>provided</scope>
  </dependency>
</dependencies>

</project>
A couple of things worth pointing out:
- I've added the spring-source maven repo in order to get the spring dependencies
- I'm using Jetty 8 from eclipse, who have taken over from codehaus (who took over from mortbay)
- I'm attaching sources for all dependencies that make them available, so that you can drill down into the source while debugging
- I'm setting the source and target jdk compliance to 6
- I'm using Jetty-jsp 8.1.4 - many other jstl implementations I tried have bugs, including a nasty one where recursive calls in tag-files would not compile.
- I've never really bothered with things like maven archetypes, which is probably lazy-stupid of me. I tend to start from a pom that i've created previously then modify it to suit my needs.
After creating the pom in my project directory I create the src/main/java and src/test/java directories and then run mvn eclipse:eclipse to fetch the dependencies and create the eclipse .project and .classpath files. Having done that I import the project to Eclipse.
Once I have the project in Eclipse I create a few more directories - specifically the META-INF/webapp/WEB-INF directory to host my web.xml and spring context files (amongst other things).
I typically start with a spring application context and a spring web context, so I can specify beans at a larger scope than the web-application. Here's some simple example web and spring configs, all of which I place in WEB-INF:
web.xml
<?xml version="1.0" encoding="UTF-8"?>
<web-app xmlns:xsi="http://www.w3.org/2001/XMLSchema-instance"
xmlns="http://java.sun.com/xml/ns/javaee"
xmlns:web="http://java.sun.com/xml/ns/javaee/web-app_2_5.xsd"
xsi:schemaLocation="
  http://java.sun.com/xml/ns/javaee
  http://java.sun.com/xml/ns/javaee/web-app_3_0.xsd"
id="WebApp_ID" version="3.0">

<listener>
  <listener-class>
    org.springframework.web.context.ContextLoaderListener
  </listener-class>
</listener>

<context-param>
    <param-name>contextConfigLocation</param-name>
    <param-value>
        /WEB-INF/application-context.xml
    </param-value>
</context-param>

<!-- Handles all requests into the application -->
<servlet>
    <servlet-name>Spring MVC Dispatcher Servlet</servlet-name>
    <servlet-class>
      org.springframework.web.servlet.DispatcherServlet
    </servlet-class>
    <init-param>
        <param-name>contextConfigLocation</param-name>
        <param-value>/WEB-INF/web-context.xml</param-value>
    </init-param>
    <load-on-startup>1</load-on-startup>
</servlet>

<servlet-mapping>
    <servlet-name>Spring MVC Dispatcher Servlet</servlet-name>
    <url-pattern>/</url-pattern>
</servlet-mapping>

</web-app>
application-context.xml
<?xml version="1.0" encoding="UTF-8"?>
<beans xmlns="http://www.springframework.org/schema/beans"
  xmlns:xsi="http://www.w3.org/2001/XMLSchema-instance"
  xmlns:context="http://www.springframework.org/schema/context"
  xsi:schemaLocation="
http://www.springframework.org/schema/beans
http://www.springframework.org/schema/beans/spring-beans-3.0.xsd
http://www.springframework.org/schema/context
http://www.springframework.org/schema/context/spring-context-3.0.xsd">

<!-- Define your application beans here. They will be available to the
   beans defined in your web-context because it is a sub-context.

   Beans defined in the web-context will not be available in the
   application context.
-->

</beans>
web-context.xml
<?xml version="1.0" encoding="UTF-8"?>
<beans xmlns="http://www.springframework.org/schema/beans"
  xmlns:xsi="http://www.w3.org/2001/XMLSchema-instance"
  xmlns:context="http://www.springframework.org/schema/context"
  xmlns:mvc="http://www.springframework.org/schema/mvc"
  xsi:schemaLocation="
http://www.springframework.org/schema/mvc
http://www.springframework.org/schema/mvc/spring-mvc-3.0.xsd
http://www.springframework.org/schema/beans
http://www.springframework.org/schema/beans/spring-beans-3.0.xsd
http://www.springframework.org/schema/context
http://www.springframework.org/schema/context/spring-context-3.0.xsd">

<!-- Configures the @Controller programming model -->
<mvc:annotation-driven/>

<!-- Forwards requests to the "/" resource to the "home" view -->
<mvc:view-controller path="/" view-name="index"/>

<mvc:resources mapping="/i/**" location="WEB-INF/images/" />
<mvc:resources mapping="/c/**" location="WEB-INF/css/" />
<mvc:resources mapping="/s/**" location="WEB-INF/scripts/" />
<mvc:resources mapping="/favicon.ico"
  location="WEB-INF/images/favicon.ico" />

<!-- Resolve jsp's -->
<bean id="viewResolver"
  class="org.springframework.web.servlet.view.UrlBasedViewResolver">
    <property name="viewClass"
      value="org.springframework.web.servlet.view.JstlView"/>
    <property name="prefix" value="/WEB-INF/views/"/>
    <property name="suffix" value=".jsp"/>
</bean>

<!-- i18n message source -->
<bean id="messageSource"
  class="
    org.springframework.context.support.
      ReloadableResourceBundleMessageSource">
    <property name="basename" value="/WEB-INF/i18n/messages" />
    <property name="defaultEncoding" value="UTF-8"/>
    <property name="cacheSeconds" value="30" />
</bean>

</beans>
Some important things to note in this file are:
- We're using the annotation model for spring Controllers, hence there aren't any Controller beans specified in this xml
- We're mapping static resources to be served efficiently by the Spring dispatcher servlet
- We've set up a view resolver to look for jsp's in /WEB-INF/views. Note that when specifying a view in Controller code you drop the .jsp suffix.
- We're configuring an internationalization message source, just so we can demonstrate use of a spring taglib a bit later...
Now we need to create a class to set up the embedded Jetty.
Embedded Jetty
package com.sjl;

import java.io.*;
import java.net.*;
import java.util.*;

import org.eclipse.jetty.server.*;
import org.eclipse.jetty.server.handler.*;
import org.eclipse.jetty.server.nio.*;
import org.eclipse.jetty.util.thread.*;
import org.eclipse.jetty.webapp.*;

/**
 * Example WebServer class which sets up an embedded Jetty
 * appropriately whether running in an IDE or in "production"
 * mode in a shaded jar.
 */
public class WebServer
{
    // TODO: You should configure this appropriately for
    // your environment
    private static final String LOG_PATH =
      "./var/logs/access/yyyy_mm_dd.request.log";

    private static final String WEB_XML =
      "META-INF/webapp/WEB-INF/web.xml";
    private static final String CLASS_ONLY_AVAILABLE_IN_IDE =
      "com.sjl.IDE";
    private static final String PROJECT_RELATIVE_PATH_TO_WEBAPP =
      "src/main/java/META-INF/webapp";

    public static interface WebContext
    {
        public File getWarPath();
        public String getContextPath();
    }

    private Server server;
    private int port;
    private String bindInterface;

    public WebServer(int aPort)
    {
        this(aPort, null);
    }

    public WebServer(int aPort, String aBindInterface)
    {
        port = aPort;
        bindInterface = aBindInterface;
    }

    public void start() throws Exception
    {
        server = new Server();

        server.setThreadPool(createThreadPool());
        server.addConnector(createConnector());
        server.setHandler(createHandlers());
        server.setStopAtShutdown(true);

        server.start();
    }

    public void join() throws InterruptedException
    {
        server.join();
    }

    public void stop() throws Exception
    {
        server.stop();
    }

    private ThreadPool createThreadPool()
    {
        // TODO: You should configure these appropriately
        // for your environment - this is an example only
        QueuedThreadPool _threadPool = new QueuedThreadPool();
        _threadPool.setMinThreads(10);
        _threadPool.setMaxThreads(100);
        return _threadPool;
    }

    private SelectChannelConnector createConnector()
    {
        SelectChannelConnector _connector =
            new SelectChannelConnector();
        _connector.setPort(port);
        _connector.setHost(bindInterface);
        return _connector;
    }

    private HandlerCollection createHandlers()
    {
        WebAppContext _ctx = new WebAppContext();
        _ctx.setContextPath("/");

        if(isRunningInShadedJar())
        {
            _ctx.setWar(getShadedWarUrl());
        }
        else
        {
            _ctx.setWar(PROJECT_RELATIVE_PATH_TO_WEBAPP);
        }

        List<Handler> _handlers = new ArrayList<Handler>();

        _handlers.add(_ctx);

        HandlerList _contexts = new HandlerList();
        _contexts.setHandlers(_handlers.toArray(new Handler[0]));

        RequestLogHandler _log = new RequestLogHandler();
        _log.setRequestLog(createRequestLog());

        HandlerCollection _result = new HandlerCollection();
        _result.setHandlers(new Handler[] {_contexts, _log});

        return _result;
    }

    private RequestLog createRequestLog()
    {
        NCSARequestLog _log = new NCSARequestLog();

        File _logPath = new File(LOG_PATH);
        _logPath.getParentFile().mkdirs();

        _log.setFilename(_logPath.getPath());
        _log.setRetainDays(90);
        _log.setExtended(false);
        _log.setAppend(true);
        _log.setLogTimeZone("GMT");
        _log.setLogLatency(true);
        return _log;
    }

    private boolean isRunningInShadedJar()
    {
        try
        {
            Class.forName(CLASS_ONLY_AVAILABLE_IN_IDE);
            return false;
        }
        catch(ClassNotFoundException anExc)
        {
            return true;
        }
    }

    private URL getResource(String aResource)
    {
        return Thread.currentThread().
            getContextClassLoader().getResource(aResource);
    }

    private String getShadedWarUrl()
    {
        String _urlStr = getResource(WEB_XML).toString();
        // Strip off "WEB-INF/web.xml"
        return _urlStr.substring(0, _urlStr.length() - 15);
    }
}
Notice that here we try to load a class that will only ever be available if we're running in test mode (e.g. directly from Eclipse).
If the class is found we assume we're running in exploded form, otherwise we assume we're running in a shaded jar - this is so that we can use the correct path to locate the web resources.
If you're trying this out you must make sure that the com.sjl.IDE class exists in your test source tree!.
Spring MVC Controller
package com.sjl.web;

import org.springframework.stereotype.*;
import org.springframework.web.bind.annotation.*;
import org.springframework.web.servlet.*;

@Controller
public class Home {
    @RequestMapping("/")
    public ModelAndView home()
    {
        return new ModelAndView("index");
    }
}
A very simple Controller that simply tells Spring to render the index.jsp view when a request is made for the root of the web-app.
index.jsp
<%@taglib prefix="spring" uri="http://www.springframework.org/tags"%>
<html>
  <body>
    <p><spring:message code="hello"/></p>
  </body>
</html>
messages.properties
hello=Hi
That's almost everything. You will need a couple of other little pieces, for example a main class to instantiate the WebServer.
Project directory structure
Your project directory structure should end up looking something like this:
|_src
|___main
|_____java
|_______META-INF
|_________webapp
|___________WEB-INF
|_____________[web.xml and spring context configs here]
|_____________css
|_____________i18n
|_____________images
|_____________scripts
|_____________views
|_______________[jsp files here]
|_______com
|_________sjl
|___________web
|_____________[Spring MVC Controllers here]
|___test
|_____java
|_______com
|_________sjl
Check out the github project for the complete working example.
Comment on this postAndroid Activity Lifecycle Gotcha
My Android app has been live in Google Play for 6 months, but I'm still encountering strange bugs and behaviours, making big mistakes, and learning surprising things. The latest surprise has come with a recent flush of ICS users who's devices are putting more significant demands on my handling of the Activity lifecycle, specifically with relation to managing state.
tl:dr; - beware when invoking startActivityForResult that onActivityResult is invoked before onResume!
Before I get to the problems, lets have a quick look at the Activity lifecycle. I'm going to "borrow" google's lifecycle diagram:

Some important things to remember here are:
- Apps typically consist of multiple Activity's, and each Activity follows the above lifecycle while your app is running.
- When your Activity starts a child Activity (with
startActivityorstartActivityForResult), both theonPauseandonStoplifecycle methods of the parent Activity should be called, in that order. - When an Activity is invoked as a child Activity, its lifecycle will be completed by the time the parent Activity is fully in control again (at least
onCreate,onStart,onResume, andonPausewill have been invoked). - Your Activity can be killed off at any time after its
onPausehas completed, without necessarily passing throughonStoporonDestroy. It is critically important to remember that this includes situations where your Activity is on the back-stack waiting for a result from a child Activity, or even when it is still visible but mostly covered by a dialog!
With regard to the last point its worth familiarising yourself with the way Android manages Processes.
State, and the Application object
One simple way, you might think, to manage state without worrying too much about the Activity lifecycle is to use the Application object. Android allows you to specify your own class (extends Application), which your Activity's can access through getApplication.
That's nice. It needs care though, since the process that your Application object lives in can be killed and restarted at (perhaps) unexpected junctures. Take this scenario:
- App A starts with Activity A1, which sets up some state in the Application object.
- Activity A1 starts Activity A2, which uses the state in the Application object.
- Activity A2 fires an
Intentfor Activity B1 of App B and expects some result (lets say we fired anIntentasking for an image to be captured by the camera app). - App B starts, and launches Activity B1.
- Activity B1 is memory-heavy, so the system shuts down App A (completely kills its process), even though it is on the back-stack waiting for a result.
- Activity B1 returns, app A's Application object is created, Activity A2 is started again but Activity A1 never launched in the lifetime of this Application object so does not get the opportunity to set up the state of the Application object.
The sequence diagram might look something like this:
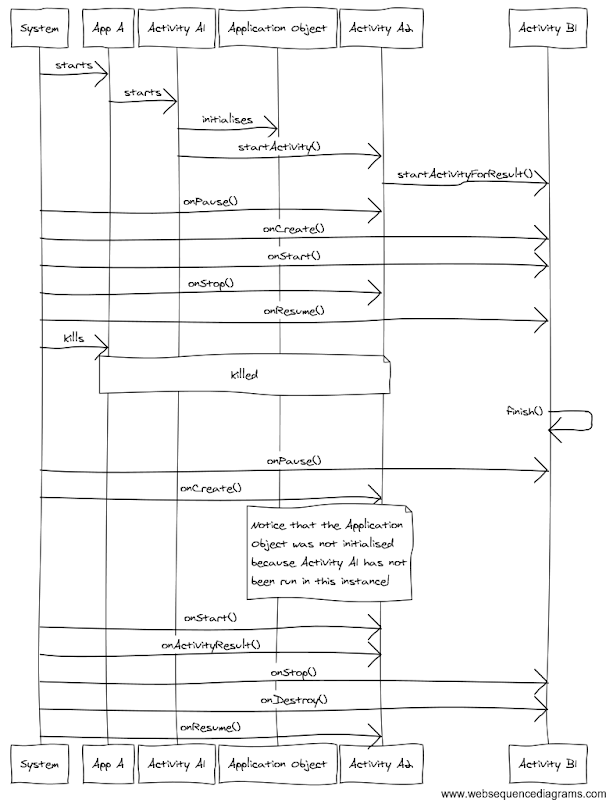
Clearly, if Activity A2 relies on A1 having run first to set up the application state, there's going to be trouble as soon as A2 starts trying to access that state after resuming from B2. If you're going to use the Application object to manage state, make sure that it is set up as part of the Application's own lifecycle methods.
Now, the gotcha that's been hurting me is this: I assumed that onActivityResult would be invoked after onResume. Turns out this is not the case, and in fact onActivityResult was getting called long before my state was re-initialised in onResume.
On my devices I never suffered from this because my process was not being killed and the state was still present in memory at the point when onActivityResult was invoked!
Comment on this postTesting Android apps
I've been developing an Android app as a spare-time project for 6 months now. I have access to 3 Android devices:
- Samsung Galaxy SII running ICS (my personal mobile)
- Samsung Galaxy Mini running Gingerbread (bought as a temporary dev device when my old HTC Desire gave up the ghost)
- Motorola Xoom II Media Edition (tablet used for day job)
My app runs beautifully on all these devices. I cannot make it crash. It really frustrates me that I get crash reports from other devices and cannot replicate them. For a spare-time project I can't afford to buy lots of devices to test with. Enter AppThwack.
AppThwack
I first heard about AppThwack after I tweeted about one of its competitors - testdroid - trying to find some testimonials from other users. I didn't find any, but I did get a reply from @tdpeterson inviting me to AppThwack's beta.
Some weeks later I finally found a spare few minutes to take a look, and I'm so glad I did!
As they are currently in beta, you need a code to be able to sign up. Mine arrived a few hours after requesting it, and I immediately signed up to give it a try. The service makes it very easy to get started, which is clever, because once you're in you really are hooked - its just too good.
Chaos Monkeys
I uploaded the latest release apk I had to hand and launched the UI Exerciser Monkey tests (these are automatic and randomised tests that poke all the buttons and what-not). From sign-up to running tests took less than 2 minutes.
The monkeys found at least two bugs that I was not aware of on that first run. I am torn between horror and delight. The horror and delight turn to embarassment when I realise that I have uploaded an obfuscated apk, and the stack-traces are in gibberese. Lesson#1 right there.
A test run takes a while to complete, but you can watch the results coming in in real time. When you realise what is going on behind the scenes its really impressive: your app is installed, launched, monkeyed, and then uninstalled simultaneously across a whole farm of different devices running different versions of Android. I'd love to see what that looks like :)
You can view the results of your test runs in a number of different ways. I like the "issues by device" mode, which lists all the devices that experienced problems or warnings, and allows you to drill down to see what happened in the monkey log - with a full stack trace of the crash - and then down again into log-cat.
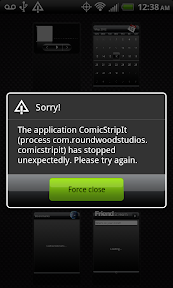
Pause a second and let that sink in. I just ran my app on 43 different devices and Android versions in under 5 mins and now I have instant access to the stack traces from the crashing devices and the full log-cat output. I even get screen-shots from some of the devices - above is from an HTC Evo 4G running 2.3.3. Holy shitcakes!
Oh, and you can filter the log-cat output directly in the web-app. Nice.

Programmed Tests
OK, now I have some crashes that I want to try to replicate which are going to involve some complex interactions. Its going to take a lot of chaos monkeys a long time to replicate those tests, but the AppThwack guys have thought of that and integrate Robotium testing too.
Robotium was also new to me, but again its a great tool and a doddle to get started:
- download the robotium jar from here
- create an Android test project, set up to test "this" project (not the project you actually want to test)
- set the manifest <instrumentation> tag's targetPackage attribute to be the package of the app you want to test
- copy the basic test code from this tutorial (I confess I find it weird that the tutorial is a pdf, not a web page!)
- tweak the test code to test your app - its a very straight-forward API
- Run the app you want to test in an emulator
- Run your test and watch as it drives your app in the emulator - great fun
Once you have a working test that you want to run over at AppThwack's device farm its really easy to get that going too:
- export a signed apk of the app you want to test (app-under-test)
- export a signed apk of the test project (sign with the same key!)
- upload app-under-test apk
- click the configure icon
- click "add test apk", and upload the test project apk
- click go
- marvel as the results start rolling in
Early days
I haven't really tried to fix my crashing bugs yet, but at least there is light at the end of the tunnel now, thanks to AppThwack and Robotium.
I noticed a few funnies along the way, which I plan to mention to the AppThwack guys when I've had a bit more experience:
- Many devices crashed at the same point, but there's no way to collapse common issues together - I found myself opening the log for each device to check the stack-traces to find out the total number of different problems. update: Pawel from AppThwack tells me a new view mode "By Failure" is in the works and will be landing in the beta very soon!)
- Some devices timed out while installing. I'm not sure if this is a problem with my app (seems unlikely?) or some issue with the devices themselves? Its not a catastrophe if its a device problem, but then probably they should be marked as warnings rather than errors. update: Pawel confirmed there were timeouts within the device-farm which I'm sure they'll resolve soon
- I noticed lots of these in the monkey logs:
java.io.FileNotFoundException: /mnt/sdcard/scriptlog.txt (Permission denied)which seem to be just noise (at least as far as I am concerned)
So far so wonderful as far as I'm concerned: my thanks to Trellis Automation for AppThwack, and I really hope the beta goes well and the business is successful!
Comment on this postMinimum Viable Products
I haven't blogged in a while. I've been very busy with lots of different things, but nothing sufficiently technical and juicy to write about. Some less techy and more entrepreneurial adventures have been floating around, so I though to make some notes on those.
Things have taken a strange turn at work, with a very ambitious new project in the pipeline that is quite a departure from our usual business. I am tasked to deliver both development-wise and in terms of defining the business model.
The development alone will be a monumental task. Defining a business model is … quite some way outside my experience. The budget is almost non-existent. The time-scales are horribly short. I'm not even sure I completely buy the basic premise of the project. And yet … it is still a strangely attractive prospect, and its all Eric Ries' fault.
The Lean Startup

In September last year I read Eric Reis' excellent book - The Lean Startup - and was inspired to put it into practice on my personal projects. I stopped getting hung up on the infinite details of feature-complete perfection, and started thinking in terms of Minimum Viable Product.
It led me to release my first ever solo "for profit" work, a super-simple mortgage repayment calculator.
The development part was fun, and I got an excuse to use one of my open-source libraries.
What turned out to be really interesting though, was that to get it online I had to register a domain-name and figure out how to point it at an Amazon S3 bucket, which I had to configure to host a website. Two things I'd never done before.
I also spent time researching keywords, used multiple landing pages on different sub-domains with different keyword content, and set up analytics to see which gets most traffic - following Eric's advice to scientifically test a theory.
For my second project I had a bit more time - I had a week off in the run-up to Christmas to use up my 2011 vacation entitlement. My wife was working, which meant I had a guilt-free coding week (my wife is great about me coding at home, but it doesn't stop me feeling guilty).

I used the time to introduce myself properly to Android and build upon a little idea that I'd had. It started out by me wanting to use comic-book style pictures of myself on my blog to represent topics.
I had spent time working on some java code to take a bitmap and process it to resemble an SVG. From there it wasn't much of a leap to try to make an app that lets you build comic strips from your photos, and so Comic Strip It! was born on Christmas Eve, 2011.
It really was a minimum viable product. The feature set of release 1.0 was:
- add photos to your comic strip, in 350x350 pixel frames
- zoom and rotate photos to fit the frames
- the comic strip would be laid out automatically in blocks of 3 frames across
- add a caption below each frame
- set a title for the comic strip
- share the comic strip (email/twitter/facebook/etc - Android made this super-easy to do)
I've added many features since, as directed by user feedback. Much of best feedback has come from people who emailed me directly with suggestions, especially in the early days, but some of the real kickers have come from disgruntled commenters.
In the spirit of Lean Startup experimentation I launched two versions - starting with the free version as described above then, in early january, a paid version that included speech balloons.
I've learned so much about people, product development/marketing/monetisation, and myself from having an app out there in the wild with no barrier between me and the users! My main problem now is finding a block of time to work on accelerating the growth of the user base.
More Experiments
Given the lack of a decent block of time to work on the app, I've spent a little time here and there on a couple of new, small, experiments. These aren't really MVP's as such, but they are in the spirit of Lean Startup.
www.tribyute.com

The first is a teaser website for an idea I had about expressing admiration for people you know, in such a way that over time an online character reference builds up, and the recipient gets an occasional boost when someone praises them.
The point here was just to test if there was any interest in the idea by asking people to leave their email to get notified later when the service goes live.
No ideas really about how to monetise it, but that wasn't the point of this one, it was just an idle thought that expressing admiration like that would be a nice thing to be able to do.
I registered a domain and pointed it at an app-engine web-app, thrown together with some simple html and css and a servlet. All in all just a few hours work. Its only just started to appear in google searches, so too early to say how the experiment will pan out.
Zazzle t-shirts

The second experiment is something quite different. For some work-related research I'd been reading about affiliate-marketing.
I was aware of the Amazon affiliate system (indeed the book links on my blog are affiliate links), but I hadn't really considered that it was a common practice til now.
Zazzle's affiliate system allows anyone to set up a "store" under the main zazzle website, and populate it with their own products.
These products are customised versions of the products that zazzle themselves sell - ie. t-shirts, hoodies, decorated mugs, etc. You even get to set your own level of commission on each product. You can see one of my designs here :)
Zazzle help with tools for marketing your products too, but because its so easy lots of people have set up stores, and there's lots of competition. For me its really just a fun experiment, and a chance to do a bit of art work, so its all good really.
Conclusion, sort of

My main point throughout all this waffle is probably this: Stop trying to do something and do it! Create the smallest possible version of your product that can deliver value, release it, and use scientific measurement to direct your efforts for what to do next. If nothing else you will learn so much!
If you are involved at some level in the development of products, buy The Lean Startup - it will change how you think about product development.
While you're there, you might want to look at The 4-hour work week, which shattered lots of my illusions about how the world works, despite the fact that I don't like a fair number of the prescribed methods.
I'll leave you with this superb Lean Startup story of how a startup saved themselves millions of dollars with a $40 prototype:
Ignite: Lean Startup - Paul Howe, Founder & CEO of NeedFeed "How $40 Saved Us 9 Months and $2MM" from DreamSimplicity on Vimeo.
Comment on this post