Pointing a domain name to an Amazon S3 bucket
I recently registered a domain name for some static content i'm hosting in Amazon's Simple Storage Service (S3). Setting up an S3 bucket as a static website is pretty straight-forward, but pointing your domain to it is tricky. After a bit of playing and googling I think I've got the right combination:
Step-1: Create your S3 website bucket
When naming your bucket you must use the same name as your domain - e.g. www.mydomain.com. The website end-point will then be something like www.mydomain.com.s3-website-eu-west-1.amazonaws.com. If you don't do this you will get warnings (404 not found, nosuchbucket).
Step-2: Remove any existing "A" records
Using the administration tools provided by your domain registrar, remove any "A" records that may have been automatically set up for your domain - you don't want your domain name pointing to "parking" sites.
Step-3: Forward your root domain to www
Forward your root domain (mydomain.com) to the www subdomain (www.mydomain.com). Most registrars and hosting companies give you the ability to forward domain names. With Fasthosts I had to "add" forwarding to my package, but it didn't cost anything extra.
If you can mask the forwarding, so much the better, as this will mean that visitors to your site will see your registered domain rather than the S3 url (depends what your registrar offers - fasthosts and godaddy both support masked forwarding). In Fasthosts admin, masking is a checkbox option in the forwarding configuration.
Step-4: Add a `CNAME` pointing to your S3 site
Add a CNAME for the www subdomain, pointing to your S3 website (www.mydomain.com.s3-website-eu-west-1.amazonaws.com). The admin tools should make this easy for you.

That's it - all you have to do now is wait for the changes to propagate (this can take a while).
See it in action...
You can see this in action with my setup:
My domain-name is overpayment-calculator.com, which forwards to www.overpayment-calculator.com, which points (via CNAME) at my S3 bucket www.overpayment-calculator.com.s3-website-eu-west-1.amazonaws.com, masking the S3 name (so that when you visit via the overpayment-calculator.com address you don't see the S3 address in the address bar).
p.s. props to fasthosts - the dns information propagated extremely quickly - from registering the domain name to acessing my site via that domain name (including the time it took me to do the set up) took less than one hour!
Comment on this postPlus-One any page - Google +1 Bookmarklet
Many pages that you might want to share don't have Google+  buttons. This bookmarklet makes it easy to plus-one any page directly while browsing it - share from anywhere!
To install the bookmarklet just drag the Google+1 link below to your browser bookmarks bar:
To use the bookmarklet at any time while browsing the web just click the link on your bookmarks bar and a +1 button will appear in the top-right corner of the page. Click the plus one button to share and comment just like you would on any other site that already has +1 buttons (feel free to test it out on this page!).
I have tested this bookmarklet in Chrome 16.0.9 and Firefox 8.0. Please leave a comment if you have trouble with other browsers and I'll see what I can do.
Internet Explorer 6 users might struggle - the bookmarklet code is longer than IE6 can cope with. May I suggest upgrading to one of the many much better browsers available, such as Chrome or Firefox.
Alternatively you can try this bookmarklet (disclaimer: I cannot test it - I don't have IE6) - drag the "Google+1" to your browser links bar:
Enjoy!
Comment on this postHosting a static website in Amazon S3
Amazon Simple Storage Service - S3 - can be used to host a static web-site, but it isn't immediately obvious how to set this up. Here's how I did it (I'm using the standard AWS console for this):
Step-1: If you haven't already, sign up for Amazon S3
Step-2: Log-in to the AWS console, and go to the S3 Tab
Step-3: Create an S3 bucket:
It doesn't really matter what name you give your bucket unless you plan to forward a domain name to your S3 hosted site

Step-4: Upload your static site to the bucket
Select your bucket in the "Buckets" pane, then right-click in the "Objects and Folders" pane and choose "upload". If you are uploading many folders you'll probably want to use the "enhanced" uploader applet.
Step-5: Set your bucket to be a website:
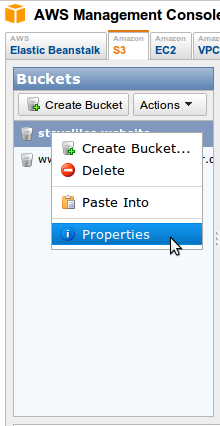
First, right-click on your bucket in the "Buckets" pane (far left) and choose "Properties".

The properties of your bucket will appear in the "Properties" pane at the bottom of the screen.

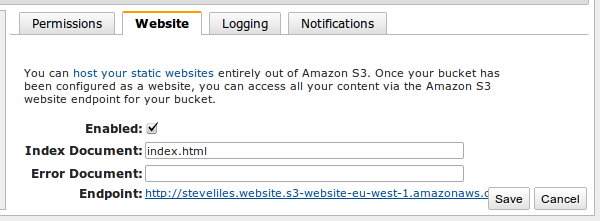
In the bucket propertes go to the "Website" tab. Make sure to:
- Check the "enabled" box
- Enter the name of an "index document" in the box (this will be page that should be loaded if someone visits the root of your bucket - websites typically us index.html).
- Note the "endpoint" url - this will be the url to your website.

If you open the endpoint url in a separate tab in your browser now you will see permission denied errors, so lets fix that...
Step-6: Make your web-site accessable to viewers:
- Still in the bucket "Properties" pane, open the "Permissions" tab and click "Edit Bucket Policy" - a window pops up.
- Paste in the code from the box below, replacing
mybucketnamewith, well, your bucket name :) - Click
saveand your done - go visit that end-point url which should now be hosting your static website :)
Here's the permissions policy you need - don't forget to change mybucketname!
{
    "Version": "2008-10-17",
    "Statement": [{
        "Sid": "PublicReadForGetBucketObjects",
        "Effect": "Allow",
        "Principal": {
            "AWS": "*"
        },
        "Action": "s3:GetObject",
        "Resource": "arn:aws:s3:::mybucketname/*"
    }]
}

Step-7: Registered a domain-name? Point it at your S3 hosted website...
See my other post on how to forward a domain name to an S3 bucket.
Comment on this postMicroformats, rich snippets, rel=author, and search listings
Whilst moving my blog from Blogger to github pages I've been looking into various ways to bump up my traffic.
I came across schema.org microformats some time ago and read about plans from Google, Yahoo and Microsoft to support them. I implemented the BlogPosting microformat to mark up my posts "semantically", and waited to see what google would make of it.
I admit, I was pretty excited at the thought of my search listings being presented in a more interesting fashion - I think that would really make them stand out. Here's an example of what Google's "rich snippets" testing tool makes of my articles:

Unfortunately to-date it hasn't made a great deal of difference to how my posts are presented in a google search result.

The first result in that listing image is for my blog. The only difference I see is that my blog result shows a date (which is nice, but I'm not sure its there because of the rich snippets markup - my old blogger blog shows dates like this too, and currently has no metadata markup that I can spot in the html source).
So much for rich snippets.
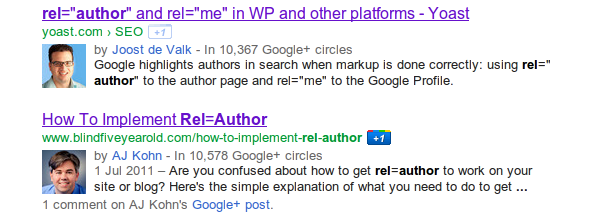
More recently I came across rel=author, and again I've been quite excited to try it out. This time I checked before-hand and found a handful of webby types who've got this working on their blogs. Here's what they look like:

A couple of weeks later I'm still having a bit of a trial getting this to work. I've done the setup exactly as described by google and a bunch of these other guys who've got it working - no joy. I'm using the three-way setup as follows:
- From each blog post, link to my about page with rel="author" (I've linked the lego man image at top-right in the header).
- From my about page, link to my google profile with rel="me" (I have two links, one
<link rel="me">in the<head>, and one in an<a rel="me" ..in the G+ icon in the navigation bar just below the header. - From my google profile, create a contributes-to link back to my about page.
The reason for this set of reciprocal links is so that google can trust that the content really is produced by you, and its no hard-ship to set up. Except that for some reason I can't fathom it just doesn't work for me.
The rich-snippets testing tool gives me the all-clear, and even shows an example search listing:

I've tried about a dozen variants now, each time waiting for a re-index before trying something different (you can tell when you've been indexed using Google's Webmaster Tools).
So far I've tried:
- Relative links between blog-post and about page
- Absolute links between blog-post and about page
- All links as
<link>elements in the<head> - All links as
<a>elements in the page<body> - All combinations of the above alternatives
I have a few remaining alternatives in the works. One is to remove all rel=me links to profiles other than google (I currently also have twitter and linked-in profiles linked with rel=me).
Another is to add a link to my google+ profile in an <a href="https://plus.google.com/105248011271585565954?rel=author">Steve+</a> (yes, with the + at the end of the link text - see option 2, here).
There's also this form which sounds tantalisingly like it might be a necessary part of the process, and which I hadn't previously seen mentioned anywhere. I've submitted the form, but a bit of googling suggests that it will make no difference.
Comment on this postA multi-class union CSS selector
Update: In the original post I got my terminology all wrong, including in the title. Changing the title would move the post and lose the comments, so I've left the title unchanged. The title of this post should actually always have been:
A multi-class intersection CSS selector
Several times while working on the styling of this blog I've wanted to style elements differently when the complete combination or set intersection of css classes are used on the same element. If the css classes are applied separately the style should not apply. Until today I didn't realise that this is, in fact, both possible and easy to achieve.
Here's the html I want to be able to write:
<div class="urgent">something urgent</div>
<div class="important">something important</div>
<div class="urgent important">urgent & important</div>
And this is how that should look:
The urgent & important text should be bold, red and italic in your browser. Notice that neither the "urgent" or the "important" are italic - that only comes when both css classes combine on the same element.
Here are three ways you can achieve the effect. Make sure you get to option-3, even if you have to skip options 1 and 2 (hint: they both suck).
Option 1: specific, separate css class
<style>
  .urgent { color:red; }
  .important { font-weight:bold; }
  .both   { font-style:italic; }
</style>

<div class="urgent">Red Text</div>
<div class="important">Bold Red Text</div>
<div class="urgent important both">Bold Italic Red Text</div>
This is nasty. I want to define my css classes to be as orthogonal and meaningful as possible, and while creating my html markup I do not want to be "mixing concerns" that should be kept separate.
Option 2: nested html tags and ancestry selectors
<style>
  .urgent { color:red; }
  .important { font-weight:bold; }
  .urgent .important { font-style:italic }
</style>

<div class="urgent">Red Text</div>
<div class="important">Bold Red Text</div>
<div class="urgent">
  <div class="important">Bold Italic Red Text</div>
</div>
Double nasty, take it away! Now I've had to change my html markup to nest .important under .urgent, just so I can style things as I want them. It also doesn't work if I nest them the other way around. This is really stupid and annoying: styling should be separate from markup.
OK, so here's the right way to do it, and I just can't believe it took me so long to feel the pain hard enough to go looking for a solution...
Option 3: use the sub-set* selector
<style>
  .urgent { color:red; }
  .important { font-weight:bold; }
  .urgent.important { font-style:italic; }
</style>

<div class="urgent">Red Text</div>
<div class="important">Bold Text</div>
<div class="urgent important">Bold Italic Red Text</div>
The difference in the css declaration between option-2 and option-3 is so small I'll point it out, just in case you missed it:
- the selector uses both class names without the space separating them - like this
.urgent.important. - whereas the example in option-2
.urgent .importantseparates the two classes with a space, and matches on an element with.importantdescending from an element with.urgent.
CSS can be a thumping great pain, but just occasionally it comes up trumps.
* I can't find an "official" name for this type of selector. The section of the css spec that covers this doesn't name it other than referring to matching sub-sets. "Intersection Selector" seems like a good name to me, although "Dude McManus" in the comments calls it an "Exclusion Selector".
Comment on this post
